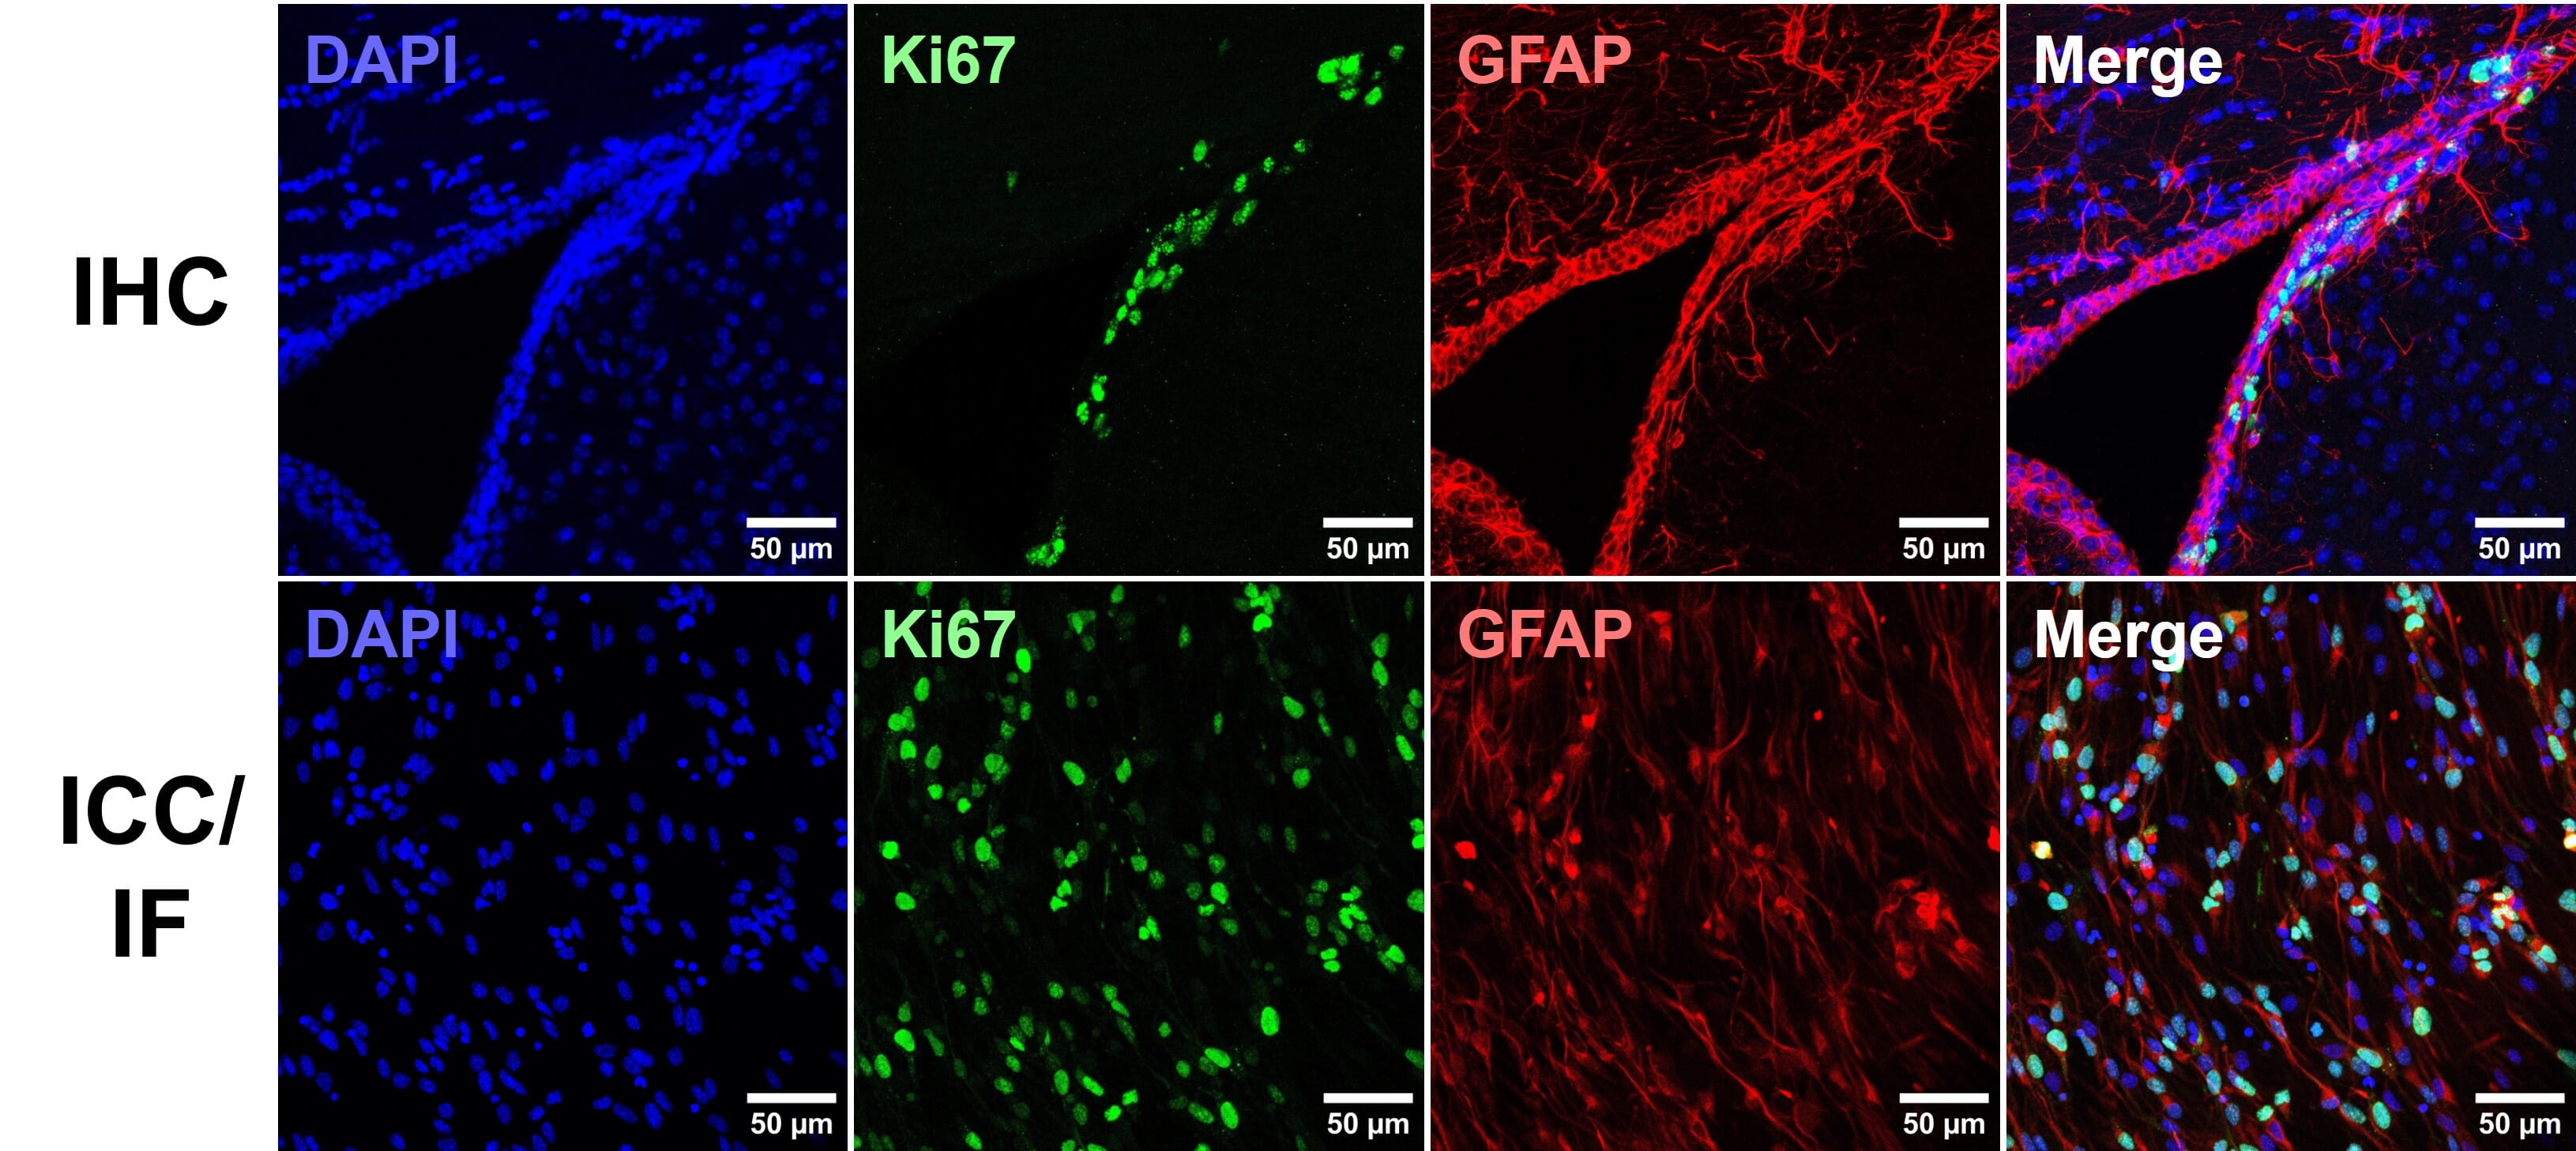
Immunohistochemistry (IHC) is a technique using antibody-epitope interactions to selectively label and visualize proteins in tissue samples. Alongside immunocytochemistry (ICC), which refers to the detection of antigens in cultured, immortalized and primary cells, these techniques enable visualization of protein distribution, subcellular localization and abundance in a semi-quantitative manner [Figure 1).
Visualization of protein targets can be either chromogenic or fluorescent. Chromogenic detection involves enzyme-conjugated antibodies generating colored precipitates at the reaction site, whereas immunofluorescence (IF) refers to fluorophore-conjugated antibodies being directly visualized. Both techniques are still in frequent use in IHC experiments, though advances made in fluorescence microscopy and fluorophore availability and flexibility have led to IF dominance, easily allowing multiplexed detection of multiple targets at once.
This guide aims to provide a comprehensive overview of IHC experimental considerations, optimization, protocols and troubleshooting to aid in achieving research objectives using IHC.
Why choose IHC/ICC?
Immunohistochemistry (IHC) is an ideal technique to choose when experimental aims revolve around target co-localization with other proteins of interest, subcellular target localization, and expression profiles in different cell-cycle or cell-type subpopulations. It therefore has distinct advantages over related techniques, such as western blots and enzyme-linked immunosorbent assays (ELISAs).
| ICC/IHC | Western Blot | ELISA |
| Sample Preparation | Fixed cells on coverslip (ICC)Fixed tissue sectioned or wholemount (IHC) | Lysed cellsDenatured protein | Lysed cells or tissueBiological fluids (plasma, urine, cell culture supernatant) |
| Protein State | In situ, but fixed | Denatured | Native, unfixed |
| Multiplex | Easily up to 4 targets; more are possible through unmixing or sequential probing | Fluorescent multiplexing is possible, as is sequential blotting (stripping and re-blotting the same membrane | No, typically requires bead-based immunoassays for multiplexing |
| Can be high throughput? | Yes | Rarely | Commonly |
| Sensitivity* ability to detect low levels of target | Medium | High | High |
| Specificity* antibody binding only the target protein | Medium | High | High, particularly sandwich ELISAs |
| Subcellular compartmentalization of proteins | Highly suitable | Limited to subcellular fractionation before application | Limited to subcellular fractionation before application |
| Expression in mixed cell populations | Highly suitable | Limited to cell sorting before application | Limited to cell sorting before application |
| Protein-protein interactions | Limited to co-localization in cells or subcellular compartments | Yes, through far-western blotting1 | Yes2 |
| Protein weight or size | None | Highly suitable | None |
Table 1: Key applications and differences between common biochemical techniques for protein detection.
History of IHC
One of the major early discoveries that facilitated the development of these techniques was the identification of the antibody-antigen interaction. Paul Erlich, a German scientist with a background in biochemistry and histopathology, won the Nobel Prize in physiology and medicine in 1908 for his work on this subject.3 One of the first immunostains, which consisted of anti-typhoid or anti-cholera antibodies conjugated to a red dye via tetrazotized benzidine, was created in the 1930s by John Marrack.4
Building on this work, Albert H. Coons developed a fluorescently conjugated antibody in the 1940s that closely resembled what we typically use today. His system consisted of a fluorescein-labeled anti-pneumococcal antibody, which could detect bacteria engulfed by macrophages.3 Another major advance took place in the 1960s with the development of enzyme conjugated antibodies, and further technical optimizations, such as the development of antigen retrieval and secondary antibody methods, occurred throughout the 1970s and 1980s.5
Coons, reflecting on his work, noted, “Fluorescent antibodies, whatever their scientific merits, are very attractive under the microscope. They shine in the dark, a brilliant greenish-yellow glow. Like pebbles in the moonlight, they weave a pattern in the forest which leads the weary children home”.3 Indeed, IHC and ICC are now essential methods in biological research and clinical diagnostics.
IHC workflow
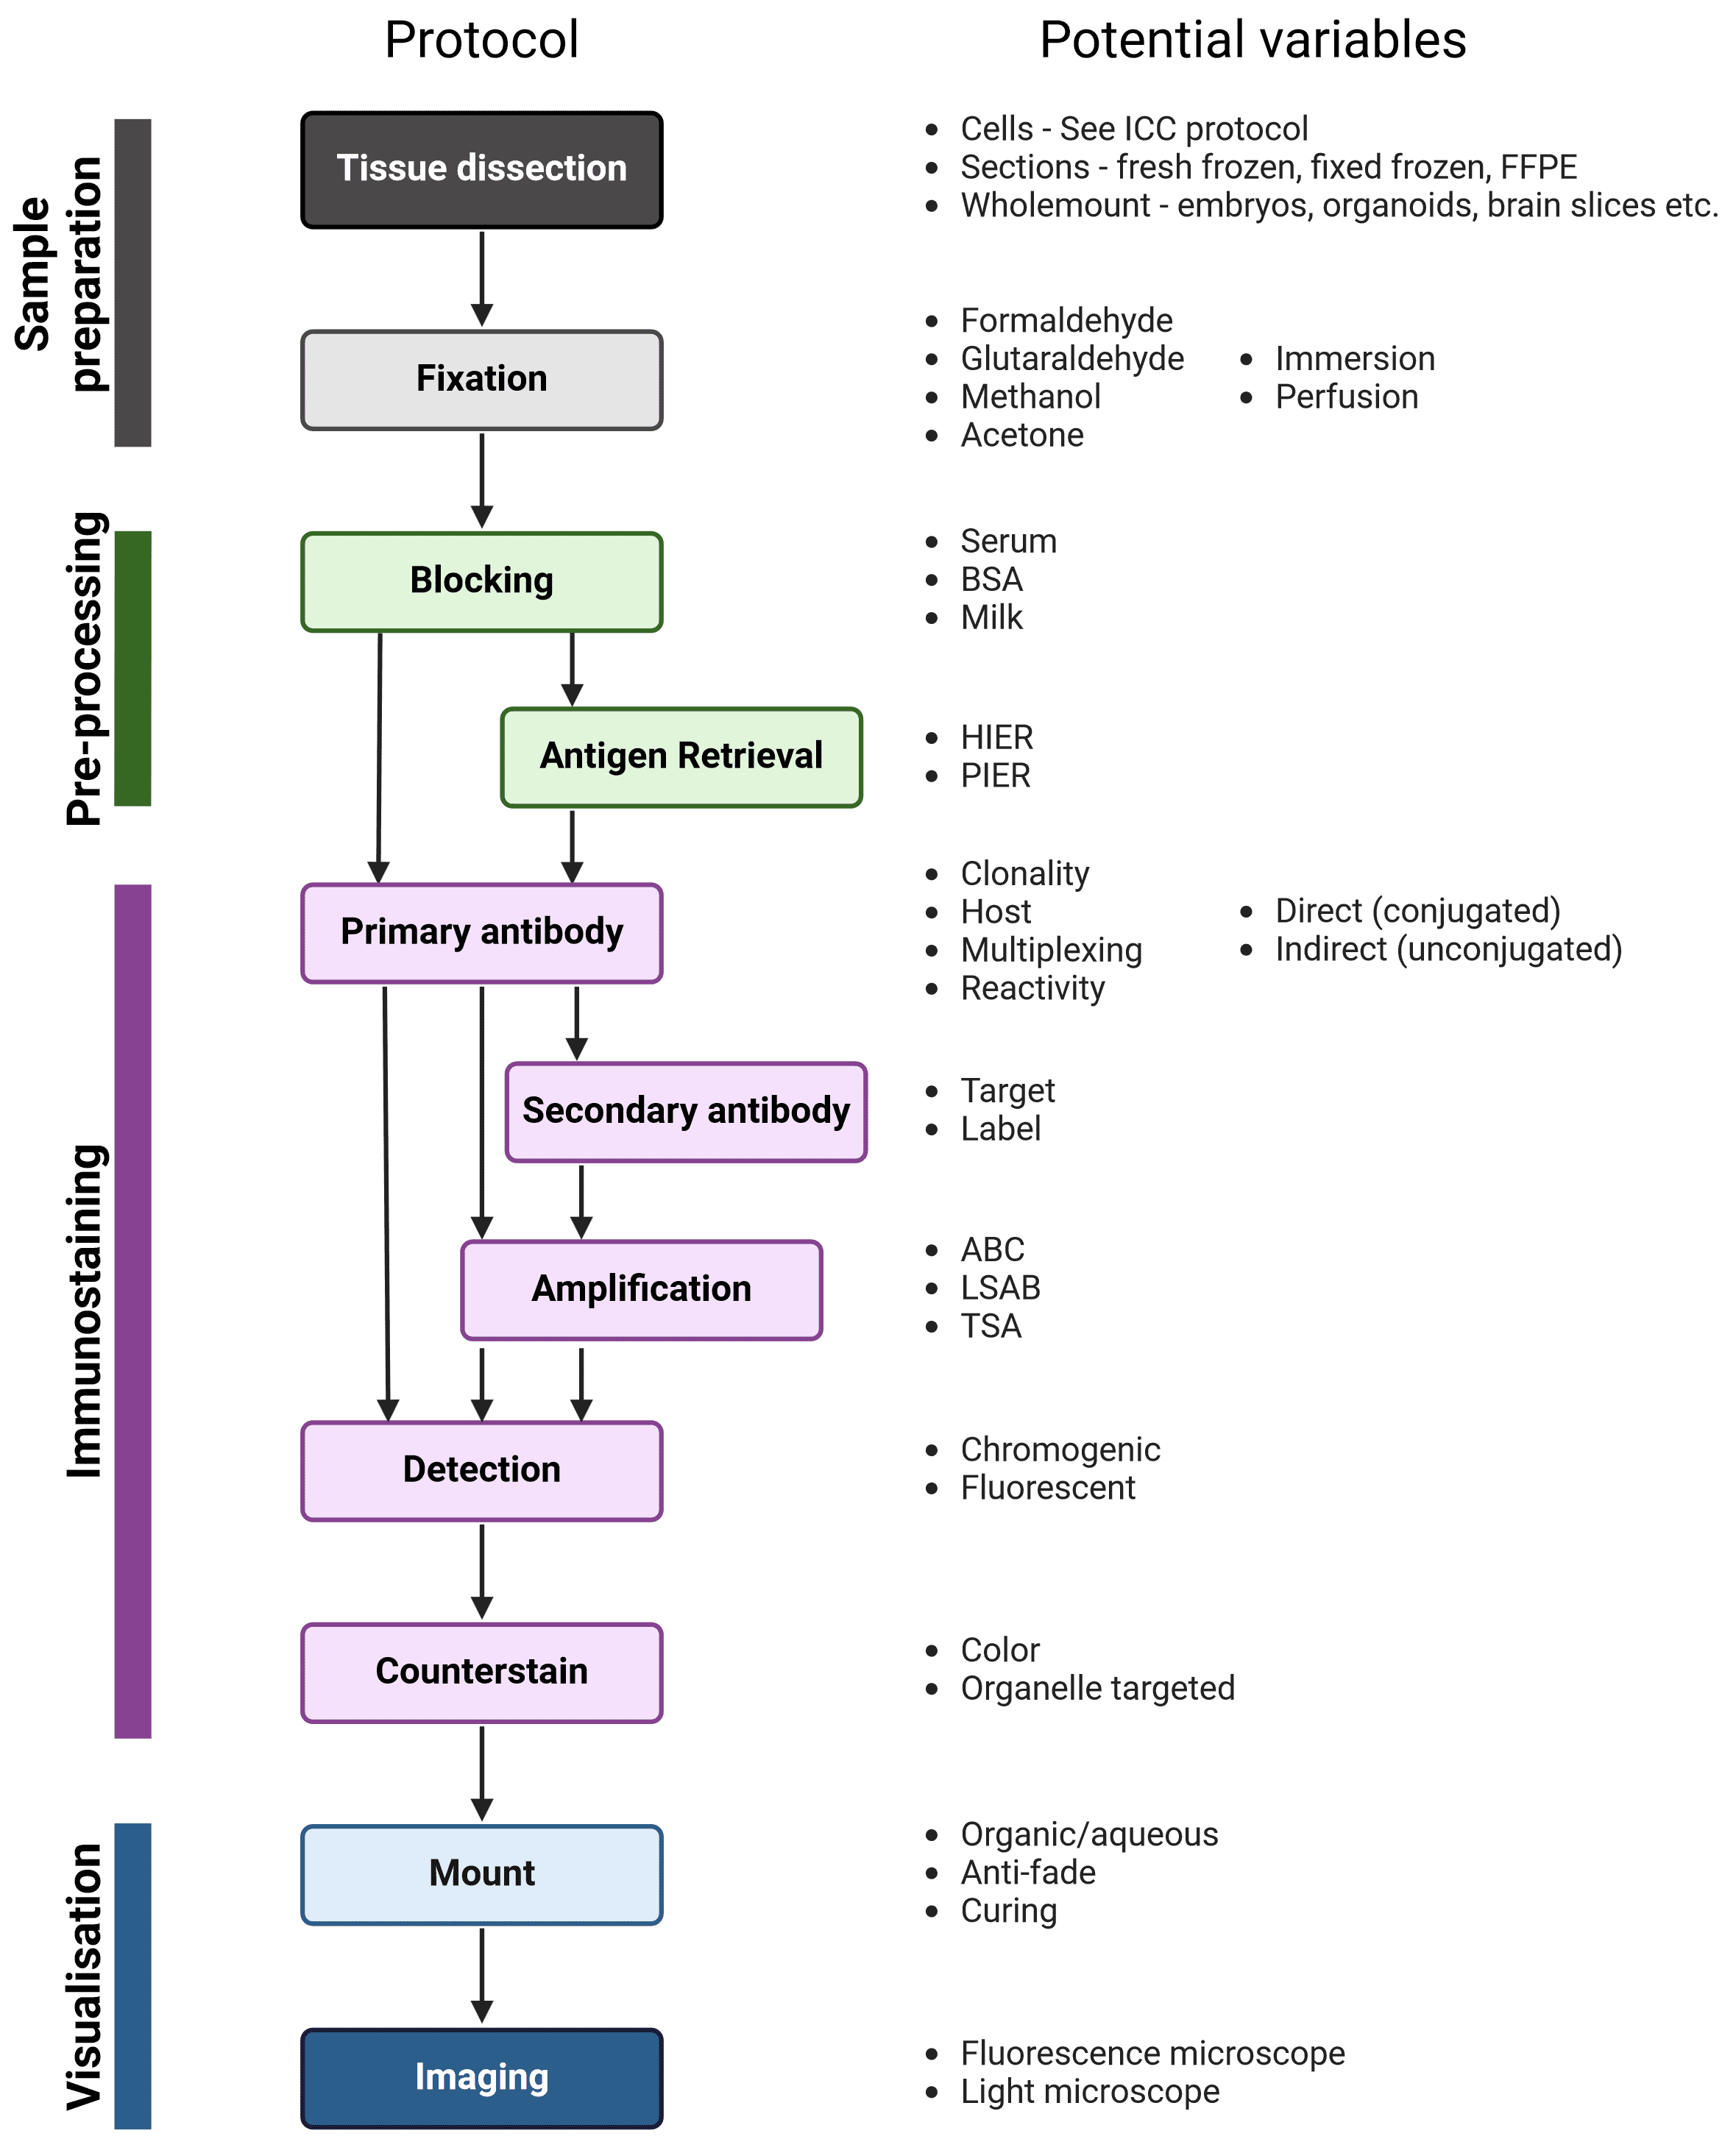
The workflow of IHC and ICC are similar; the main steps are illustrated in Figure 2, alongside variables that must be taken into account at each stage to determine the ideal experimental conditions. Broadly, samples are isolated and chemically fixed to preserve cell and molecular organization, blocked to prevent non-specific interactions between the antibodies and the sample, and incubated with antibodies that recognize a target protein. Finally, the labeled proteins are visualized using chromogenic or fluorescent methods, and observed using microscopy.
Figure 2: Generalized protocol for IHC
After fixation, immunostaining incubation steps should be performed in a humidity chamber, particularly long incubations such as primary antibody incubation. A humidity chamber can be made using a plastic box with a lid and wet paper towels layered at the bottom of the box. To create raised platforms for the slides to sit on for ease of access during immunostaining, pipette tubes can be cut to the width of the box and taped in pairs to the bottom of the box.
Sample fixation and preparation
In order to visualize proteins in a tissue sample, that tissue must first be fixed and prepared to aid in sample handling and to make the tissue amenable to antibody penetration and detection.
Fixation is an essential step in IHC, because it preserves tissue integrity and morphology, prevents cellular degradation, and maintains the antigenicity of the target molecules. Sample preparation goes hand-in-hand with fixation, and will determine how the tissue will be sectioned (if at all) and handled, which fixatives are suitable, which kinds of visualization and imaging are possible, and how the tissue is stored.
Types of fixative
The choice of fixing solution will depend on sample type, antigen, and sample preparation; there is no ideal fixative for all tissues and situations. Though many fields have well-established standard fixatives that can serve as a starting point, it is worth experimenting with other fixatives when troubleshooting IHC. The optimal fixation conditions for a given experiment, length and temperature of fixation, and pH of the fixative, must ultimately be determined empirically to eliminate underfixation or overfixation. While underfixed tissues may undergo proteolytic degradation and destruction of the target epitope, overfixation and excessive cross-linking can mask the epitope or result in high non-specific background staining.
Formaldehyde
Formaldehyde-based fixatives create methylene (CH2) cross-links between proteins or between proteins and nucleic acids, and are commonly used due their strong tissue penetration and low background. Overfixation with formaldehyde can mask target epitopes by cross-linking the amino acids involved in their structure, although antigen retrieval techniques can resolve this problem.
How do formalin, formaldehyde and paraformaldehyde differ?6
Formaldehyde fixatives are commercially available as either formalin or paraformaldehyde (PFA). Formaldehyde itself is a gas (formula CH2O), which dissolves rapidly in water. To be active as a fixative, monomeric formaldehyde is required, but while in aqueous solution, formaldehyde molecules combine to form short polymers.
Formalin is a liquid containing 37-40% formaldehyde, and the breaking up of short formaldehyde polymers in formalin is achieved through further dilution (e.g. 10% formalin), often in a physiological buffer. Formalin often also contains 10% methanol, which is added to slow down polymerization of formaldehyde that eventually causes it to precipitate as PFA. 10% formalin approximately equals 4% PFA, and will include 1% methanol.
PFA is a crystalized, white powder comprising much longer polymers of formaldehyde. To dissolve PFA and encourage dissociation to single formaldehyde molecules, heating (to ~70°C) is required, often with the addition of hydroxide ions. This ‘fresh’ formaldehyde does not contain methanol, so re-polymerization may occur eventually.
Glutaraldehyde
Glutaraldehyde is a dialdehyde molecule and acts as a stronger crosslinker than formaldehyde. Crosslinking occurs quickly, but penetration of tissue by glutaraldehyde occurs slower than with formaldehyde due to the larger molecular structure. It is often used for electron microscopy, though rarely for IHC. In part this is due to its poor compatibility with paraffin embedding, and because it can produce high autofluorescence for IF. Tissues fixed with glutaraldehyde must also be treated with an aldehyde quencher such as ethanolamine before performing IHC, because otherwise free aldehyde groups can react with antibodies. Glutaraldehyde:formaldehyde mixtures can be used for fixation, benefitting from the rapid penetration of formaldehyde and the thorough fixation of glutaraldehyde.
Precipitative fixatives
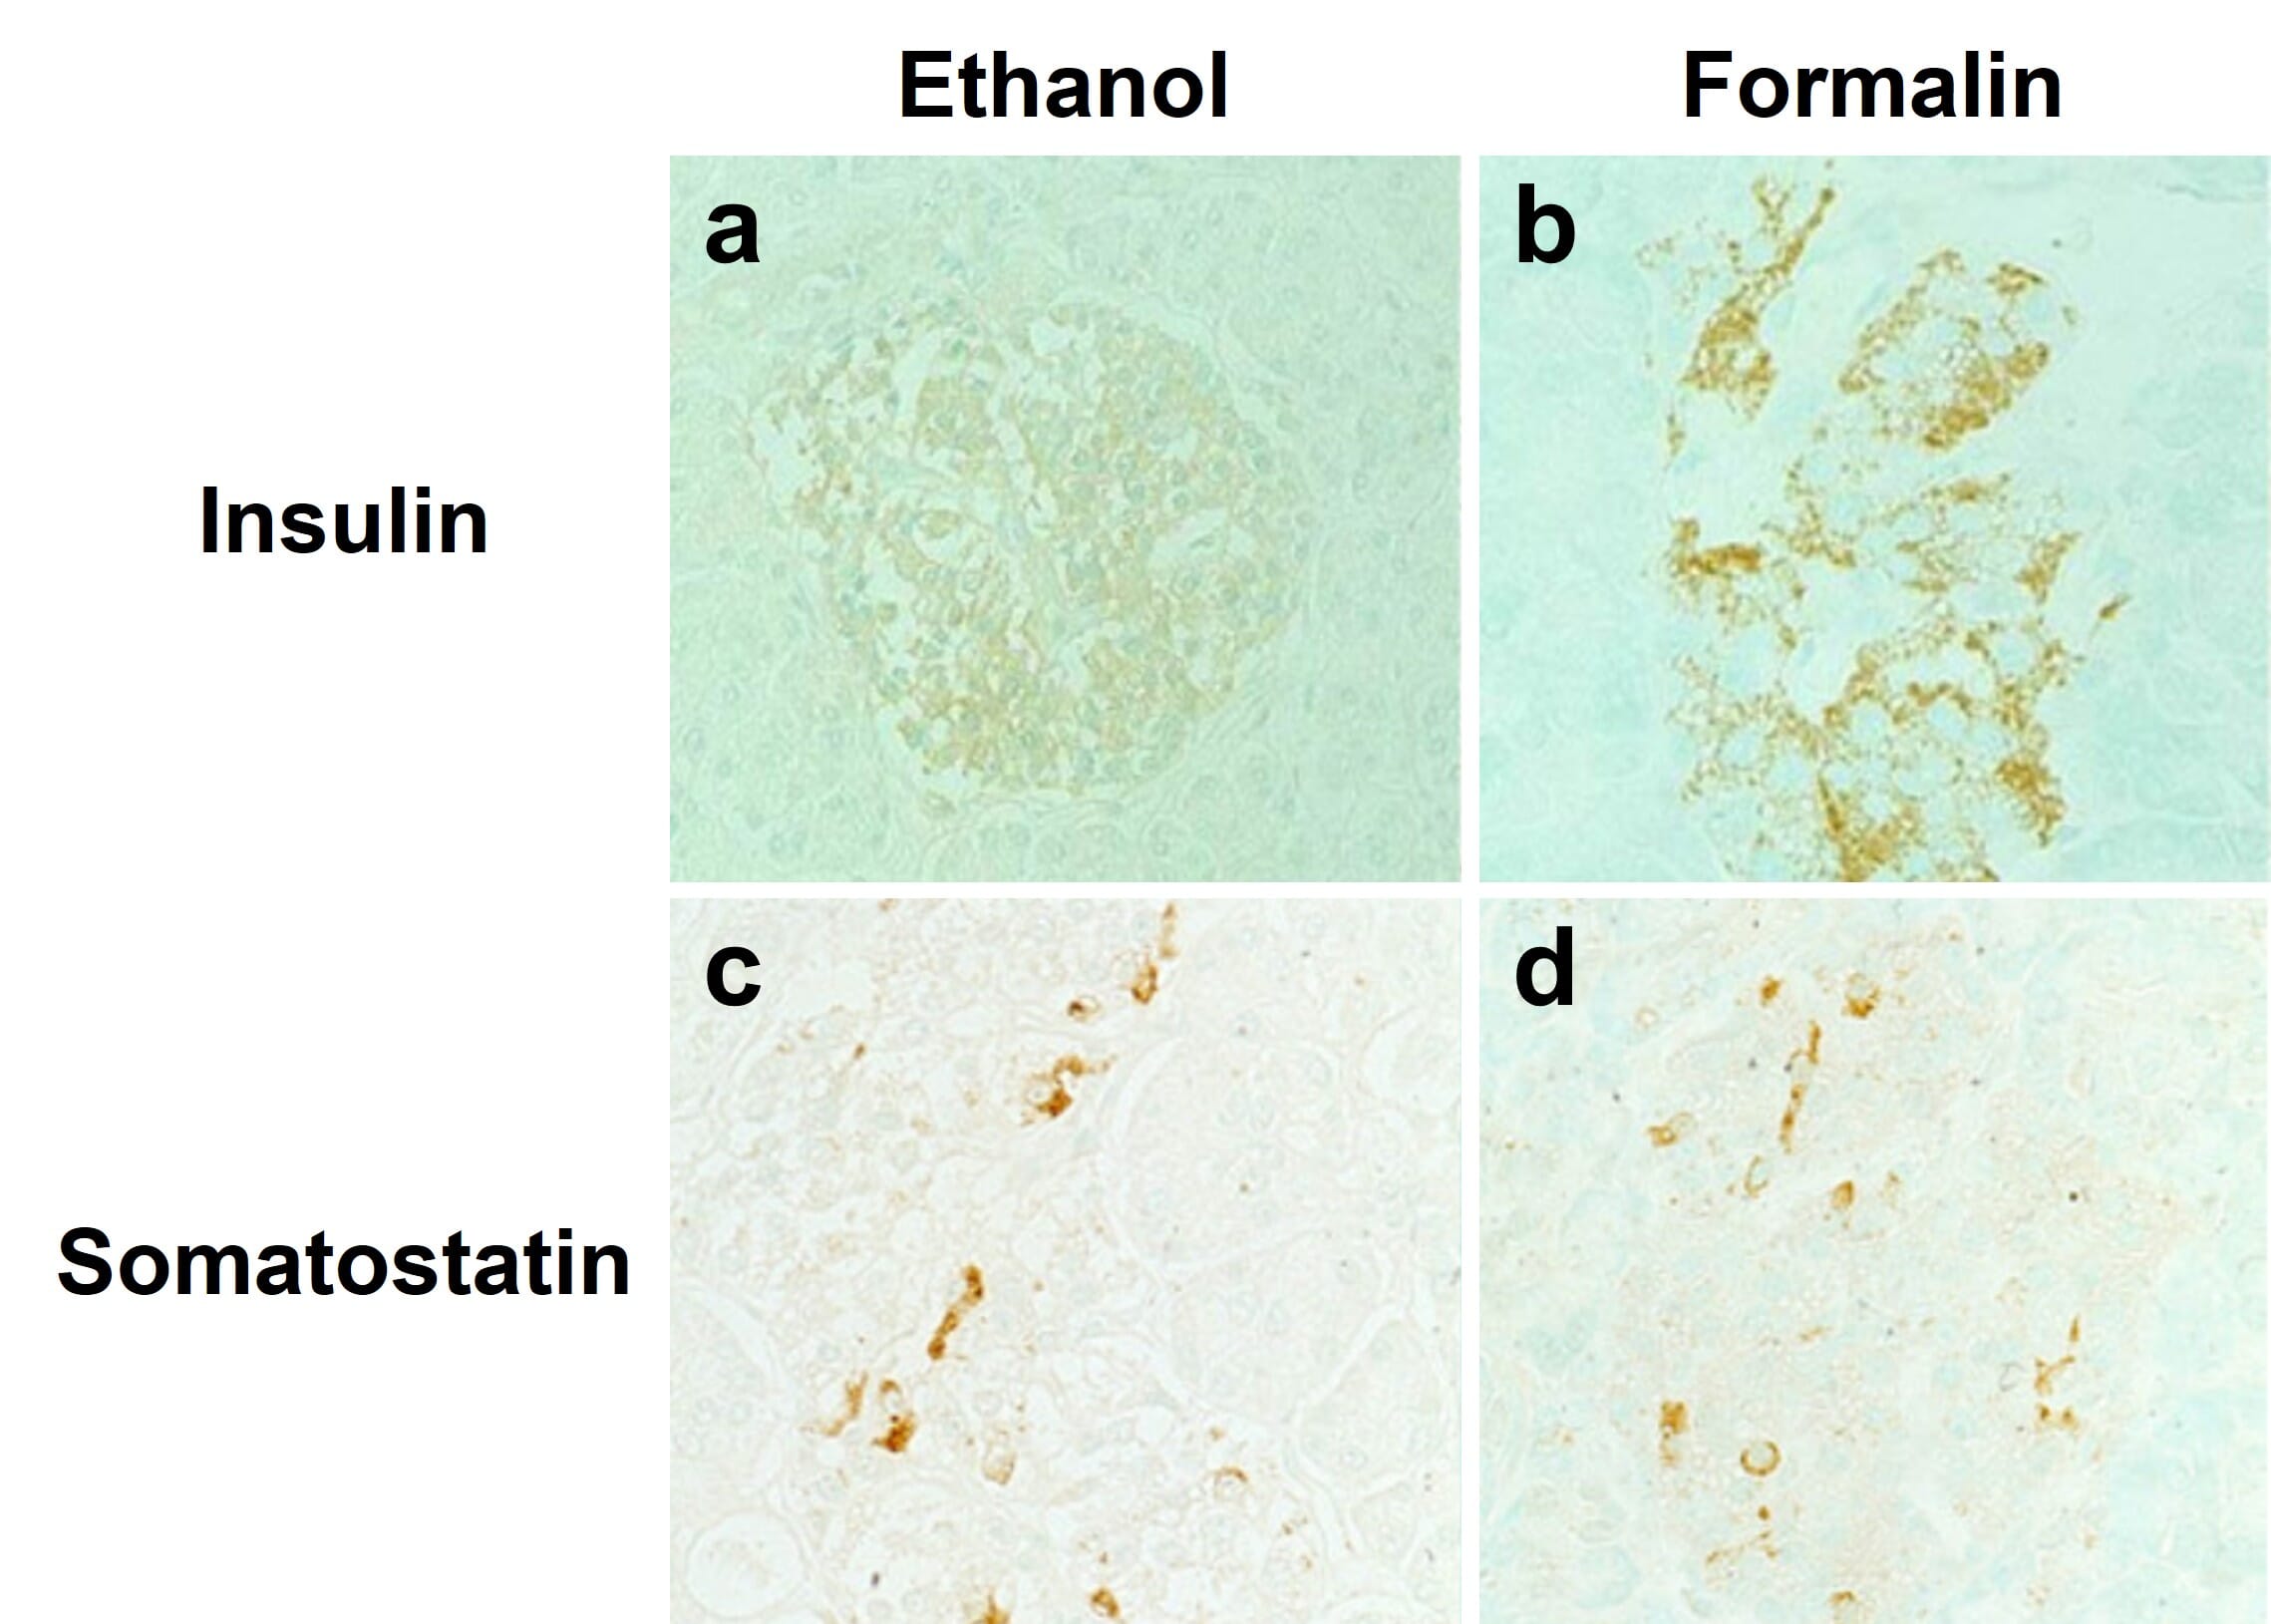
Alcohol-based fixatives, such as methanol and ethanol, are structurally similar to water molecules, allowing them to participate in hydrogen bonding in fixed tissues. These fixatives cause proteins to precipitate by changing their dielectric points, and help stabilize proteins’ secondary structure. However, alcohol fixatives do not preserve cell and tissue morphology as well as formaldehyde fixatives. Furthermore, antigen retrieval is usually not compatible with alcohol fixatives, meaning not all antibodies will work with alcohol fixation (Figure 3). Acetone can also be used to precipitate proteins in target tissues and cells, and is usually accompanied by fixation with formaldehyde or alcohols.
Figure 3: Effects of different fixatives on IHC outcome. Staining of insulin (top) is mostly abolished following fixation of paraffin-embedded pancreas in ethanol (left) compared to formalin (right), while somatostatin staining is unaffected. Nuclei are counterstained with methyl green.
Edited and reproduced under Creative Commons 4.0 CC-BY from Tsutsumi, Y. Pitfalls and Caveats in Applying Chromogenic Immunostaining to Histopathological Diagnosis. Cells 10, 1501 (2021).
Perfusion vs immersion
In perfusion fixation, fixative is injected through the vascular system of the still-intact organism, allowing for rapid fixation of organs and reducing non-specific staining of blood vessels. However, this method is technically challenging. Alternatively, the target tissue can be dissected and immediately immersed in fixative; this is usually appropriate for pieces of tissue less than 10 mm in size, and sufficient time must be allowed for full fixation, typically 2 – 24 hours at room temperature.
Sample Preparation
The most appropriate sample preparation approach will depend on the downstream applications of an IHC experiment, as tissue processing affects how the sample will be handled, mounted and imaged, as well as the kinds of visualization and analysis that are possible. The specific details of sample preparation will vary greatly for different sample types and species, and must be determined empirically.
Paraffin Embedding
Tissues that have been embedded in paraffin wax are stably preserved at room temperature for many years, making paraffin-embedding one of the most common methods for sample preparation of tissues. Paraffin-embedded tissues can be cut into thinner sections than frozen tissue (~5 μm versus ~10 μm, respectively), which can provide improved image quality and more accurate representations of tissue morphology during microscopic analysis.
Before tissue is embedded in paraffin, it is typically fixed in formalin for 4 – 24 hours to prevent cell death and changes in cell structure. The fixation step may be performed through perfusion or immersion. Following fixation, the tissue may be stored in 70% ethanol until paraffin embedding can be performed. Before embedding, the tissue sample must be dehydrated through immersion in increasing concentrations of alcohol, as paraffin wax cannot mix with water. After dehydration, the ethanol remaining in the sample is removed using xylene, and the sample is embedded in paraffin heated to ~60°C. Finally, tissue sections as thin as 4 μm are cut from the paraffin block using a microtome.
Frozen Tissue
Frozen tissue samples are beneficial when detecting highly labile post-translational modifications or endogenous enzymatic activity. For example, alkaline phosphatase activity can be detected in frozen, acetone-fixed murine hair follicles7. Freezing tissue also has the advantage of significantly shorter processing times than paraffin-embedded samples.
Frozen tissue samples are typically prepared using liquid nitrogen or dry ice, and can be directly embedded in optimal cutting temperature (OCT) compound to facilitate cryosectioning. The frozen blocks of tissue may be used immediately, or stored at -80°C for up to 1 year. During cryosectioning, slices of tissue are directly placed onto microscope slides, and then immersion fixed. Depending on the intended target protein, a short (~20 minutes) alcohol or formaldehyde-based fixation may be performed. As a result, antigen retrieval is usually not necessary when using frozen tissue.
While frozen tissue is more advantageous than paraffin-embedded tissue in some ways, it cannot be used for long-term sample preservation, for which paraffin embedding is suitable. This is because ice crystals can form in the samples over long storage, leading to cell damage. In addition, the retention of endogenous enzymatic activity in frozen tissue sections can also present a problem for the detection step of immunostaining, meaning an additional blocking step may be required.
Fixed, Free-Floating Sections
Fixed tissue can also be sectioned without paraffin embedding, particularly if thicker (>20 um) sections are taken and 3D structure of a tissue is important to the experimental aims. Fixation can either be by perfusion or immersion, which is followed by a cryopreservation step of incubating the tissue in 20-30% sucrose. Sucrose helps prevent ice crystal formation in tissues, protecting the tissue during freezing while sectioning. Sections are taken either on a cryostat or microtome, facilitated by embedding completely or partially in OCT, and are deposited into wells containing PBS. Once sections have been taken, the normal IHC protocol can be followed by sequentially transferring sections between wells containing the block, stain and wash solutions. Upon completion, the sections can be carefully moved onto slides using a paintbrush. Free-floating sections provide more 3D information, but are not suitable for long-term storage, and imaging multiple layers of cells through a thick section requires optical sectioning on a microscope to generate clear images.
Note that much thicker sections taken on a vibratome can also be used, which often involves embedding tissue in agarose before sectioning. For thick sections like this, much longer antibody incubation times may be necessary for adequate antibody penetration, and clearing might be required to mitigate light scatter through thick tissue when imaging.
Wholemount Tissue
Wholemount tissue refers to tissue that has not been sectioned, leaving cells of interest completely intact within their native histological context. Wholemount samples include mouse and chick embryos, organoids, whole Drosophila, and even entire organs or nuclei from adult organisms. Wholemounts benefit from faster preparation times (no sectioning), but other steps, such as fixation and antibody incubation, may need to be longer to allow adequate penetration of the tissue, though the overall procedure is the same. Visualization can also be more complicated, depending on the tissue in question. Flat tissues, such as layers of muscle, may fit between slide and coverslip without distorting morphology, but others will be too thick or have a specific shape, such as embryos. These can be placed in a buffer within a glass-bottomed dish and optically sectioned on a confocal microscope, while very thick samples can be embedded in agarose and imaged on a lightsheet microscope. The specific details will be highly tissue and context-dependent, and should be determined on a case-by-case basis.
Protein Phosphatase Inhibitors for Phosphorylated Targets
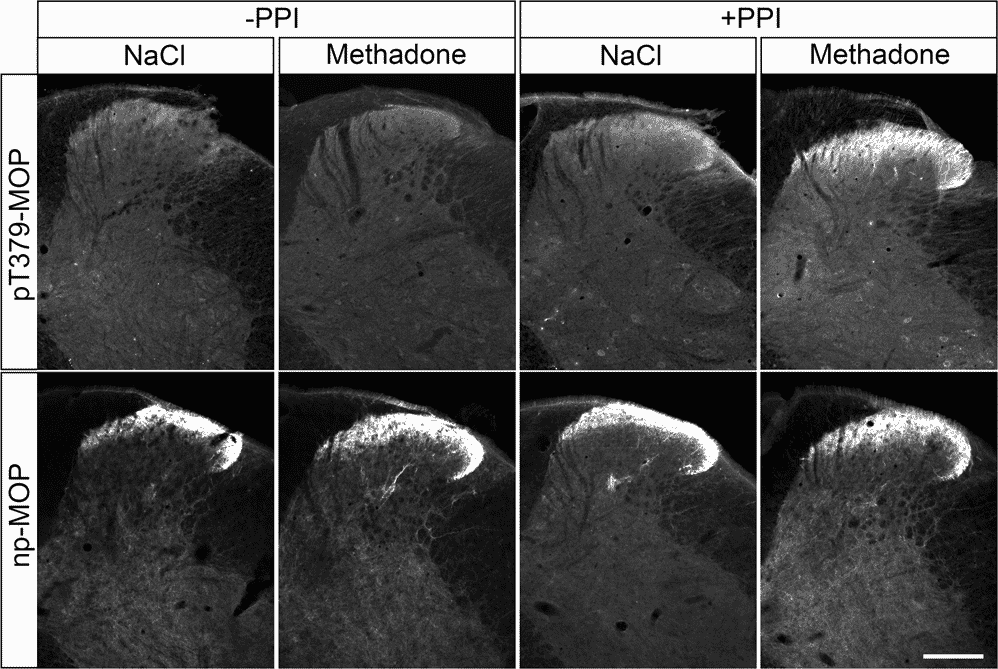
Protein phosphatase inhibitors (PPIs) are most often associated with sample preparation for western blots, but endogenous phosphatases can still affect experimental outcomes in IHC when the protein target is phosphorylated, such as for phospho-GPCRs. Including PPIs in fixatives, wash buffers and antibody incubation buffers is typically sufficient to prevent dephosphorylation of targets (Figure 4).
Figure 4: Phosphatase inhibitors for phospho-GPCR IHC. IHC for phosphorylated mu opioid receptor (MOP) following methadone treatment in the presence or absence of PPIs. Note that PPIs reveal phosphorylated MOP following methadone. Staining for non-phosphorylated MOP (np-MOP) is unaffected (bottom row). Reproduced from Fritzwanker et al. In situ visualization of opioid and cannabinoid drug effects using phosphosite-specific GPCR antibodies. Commun. Biol. 6, 419 (2023).
Antigen Retrieval
As indicated earlier, formaldehyde fixation can sometimes “mask” target antigens within a tissue sample and prevent binding between a primary antibody and its epitope. This likely occurs due to cross-linking of the amino acids in or near the epitope, or changes in the conformation of the epitope. Multiple techniques have been developed for “unmasking” antigens within a sample and are referred to as antigen retrieval. These methods typically use either heating of the sample (heat-induced epitope retrieval or HIER) or protease treatment (protease-induced epitope retrieval or PIER) to reverse antigen masking. In addition, the pH and/or cation concentration of the tissue sample may also be altered; for example, acidic or basic solution incubations may improve antibody-epitope interaction efficiency.
In general, the techniques used for antigen retrieval are too harsh or not necessary for frozen tissue samples and alcohol-fixed samples. The success of antigen retrieval is dependent on a number of factors, including the temperature, incubation time, buffer composition and pH, fixation method, specific antibody-antigen interaction, and tissue type. As a result, the optimized conditions for carrying out antigen retrieval must be determined empirically, although many tissue-specific protocols can be found in the literature.
Heat-Induced Epitope Retrieval (HIER)
In many cases, HIER, rather than PIER, is the preferred starting point for performing antigen retrieval. The sample is heated in a buffer, including citrate and EDTA buffers, for short periods of time using a microwave, water bath, pressure cooker, or other device, which is thought to help reverse cross-linking in the tissue. Buffer selection and conditions must be optimized, as they can have significant impacts on staining (Figure 5).
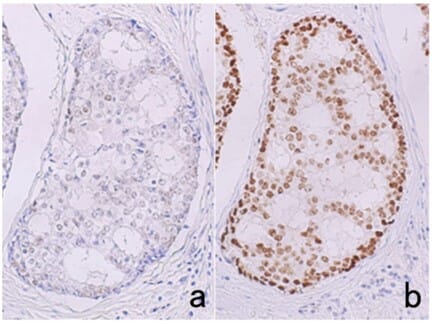
Figure 5: Effects of HIER buffer on immunostaining. Estrogen receptor immunostaining in breast cancer tissue after antigen retrieval by pressure cooker heating at 121 °C for 10 min in 10 mM citrate buffer, pH 6.0 (a), or 1 mM EDTA, pH 8.0 (b). Much stronger signal is observed when using EDTA buffer.
Edited and reproduced under Creative Commons 4.0 CC-BY from Tsutsumi, Y. Pitfalls and Caveats in Applying Chromogenic Immunostaining to Histopathological Diagnosis. Cells 10, 1501 (2021).
Protease-Induced Epitope Retrieval (PIER)
In PIER, the tissue sample is incubated with proteases, such as proteinase K, trypsin, and pepsin, to enzymatically cleave cross-links within the antigen. However, excessive protease treatment can result in a complete loss of the antigen and/or tissue structure.
Blocking Non-Specific Binding
A number of blocking reagents may be used to prevent non-specific interactions between the antibodies and epitopes in a sample. This step is crucial for eliminating unwanted background signal or staining of non-target structures. However, overblocking can also interfere with the interaction between the antibody and target antigen, reducing the signal-to-noise ratio (SNR) in the detection step. Thus, the optimal blocking conditions must be determined empirically. A separate blocking step is often not necessary, and blocking components can simply be included in antibody diluent instead.
Non-specific background binding is typically mediated by non-specific hydrophobic or ionic interactions. Neutrally charged side chains on proteins will mediate hydrophobic interactions, while charged side chains, such as those containing amino and carboxyl groups, will promote ionic and Van der Waals interactions between the antibody and tissue.
These non-specific interactions are reduced using mixtures of proteins; small concentrations of detergents; or changing the ionic strength of the blocking buffer. Blocking buffers are often composed of PBS and either normal serum and/or BSA. The normal serum should be obtained from the same species of animal that the secondary antibody was raised in, such as goat or donkey. In some cases, PBS should be replaced with TBS. For example, if an alkaline phosphatase conjugated secondary antibody will be used in the experiment, PBS should not be used at any point in the staining procedure, as PBS can interfere with alkaline phosphatase activity.
Depending on the detection method used in IHC, additional blocking steps may be required. Some tissues, such as kidney, liver, and highly vascularized tissues, exhibit endogenous peroxidase activity that must be blocked if using a horseradish peroxidase (HRP) conjugated secondary antibody. Failure to block endogenous peroxidase, which can be done by incubating the tissue sample with 3–10% hydrogen peroxide, can result in high non-specific background staining. To determine if this additional blocking step is necessary, a control tissue sample can be incubated with the chromogenic HRP substrate 3,3’-diaminobenzidine (DAB), which will reveal peroxidase activity as brown staining. In addition, many tissues, including liver, kidney, heart, brain, and lung, also express endogenous biotin, which can be blocked by incubating the tissue sample with avidin and biotin. In this case, a control tissue sample can be incubated with streptavidin-HRP, followed by DAB substrate, or with an avidin-biotin complex (ABC) reagent.
Primary Antibody Staining
Primary antibodies are generated by the immune system of a host organism (e.g. rabbit, guinea pig) that has been repeatedly immunized with an antigen. They recognize the protein of interest, rendering the target identifiable amongst the cellular milieu. A high specificity antibody that recognizes only the target of interest is essential for successful IHC, as non-specific binding can result in high background or false positive results. The following factors should be taken into account when selecting an antibody:
Reactivity
Primary antibodies will recognize antigens only from certain species, which will be the species that the immunizing antigen was originally from, as well as closely related species. For example, an antibody that recognizes a mouse protein target will often also recognize the same protein in rat, but possibly not in fish. The key determinant of this is how similar the epitope sequence is between species, allowing researchers to predict if an available antibody will work in a non-validated species.
Clonality
Both monoclonal and polyclonal primary antibodies can be used to detect the epitope of interest. Monoclonal antibodies correspond to one epitope for a given antigen, which usually produces a lower background signal as they are less likely to recognize non-target molecules. However, this increased specificity makes them less robust to conformational changes in the antigen following sample fixation. Monoclonal antibodies are also available from fewer host organisms, with the majority being produced in mice. This limits possibilities when immunostaining for multiple antigens at once because, in conventional protocols, multiplexed primary antibodies must be from different host organisms to avoid cross-reactivity by secondary antibodies.
On the other hand, polyclonal antibodies recognize multiple epitopes on an antigen. As a result, the antigenicity of these antibodies is less likely to be affected by conformational changes during fixation, but they may also exhibit a higher background signal than monoclonal antibodies. Polyclonal antibodies are also more likely to be produced in a variety of organisms, including rat, goat, guinea pig and chicken.
Optimal Conditions
As with the blocking step, the optimal primary antibody incubation conditions will vary depending on the specific antibody, the tissue sample, and the fixation conditions, among other factors. Most antibody datasheets will provide a recommended dilution range, usually within 1 – 25 μg/mL. A datasheet may give recommended concentrations to use relative to a master stock, such as 1:500, instead of absolute concentrations in μg/mL. This is particularly common for polyclonal antibodies. A range of 1:100 – 1:10000 is common to use for IHC. A higher concentration will give stronger signal, but more background, while a lower concentration will result in lower signal and background. The important factor is the SNR, which will also vary with different concentrations (Figure 6). Which concentration is right for your application depends on a number of factors, including:
- Tissue type: Some tissues have a greater propensity for higher non-specific binding, or stronger autofluorescence in certain spectral ranges.
- Staining protocol: In general, tissue samples should be incubated with primary antibody overnight at 4°C. Overnight incubation provides the antibodies with time to bind to their target antigen, while incubating at a low temperature will decrease non-specific background interactions. Shorter incubation times at room temperature may also be appropriate in some cases, particularly for antibodies that produce very low background.
- Washing protocol: A greater number of longer washes with a mild buffer (e.g. PBS only) will reduce non-specific binding but have little effect on strong antibody-epitope interactions.
- Shaking: For IHC of free-floating sections or wholemount tissue, gentle to moderate shaking is recommended during all steps to reduce background and enhance antibody penetration. For sections already on slides, this is not necessary (due to the thinness of the sections) nor recommended (in case it dislodges the sections from the slides).
- Microscopy capabilities: Confocal microscopes exclude out-of-focus light, including non-specific signal, which will increase SNR in the final image. Modern fluorescence detectors within microscopes also exhibit less detector noise, which is noise generated from the electronics in the detector itself. Powerful lasers enable visualization of dim signals that may not be visible with weaker LEDs, halogen lamps or lasers.
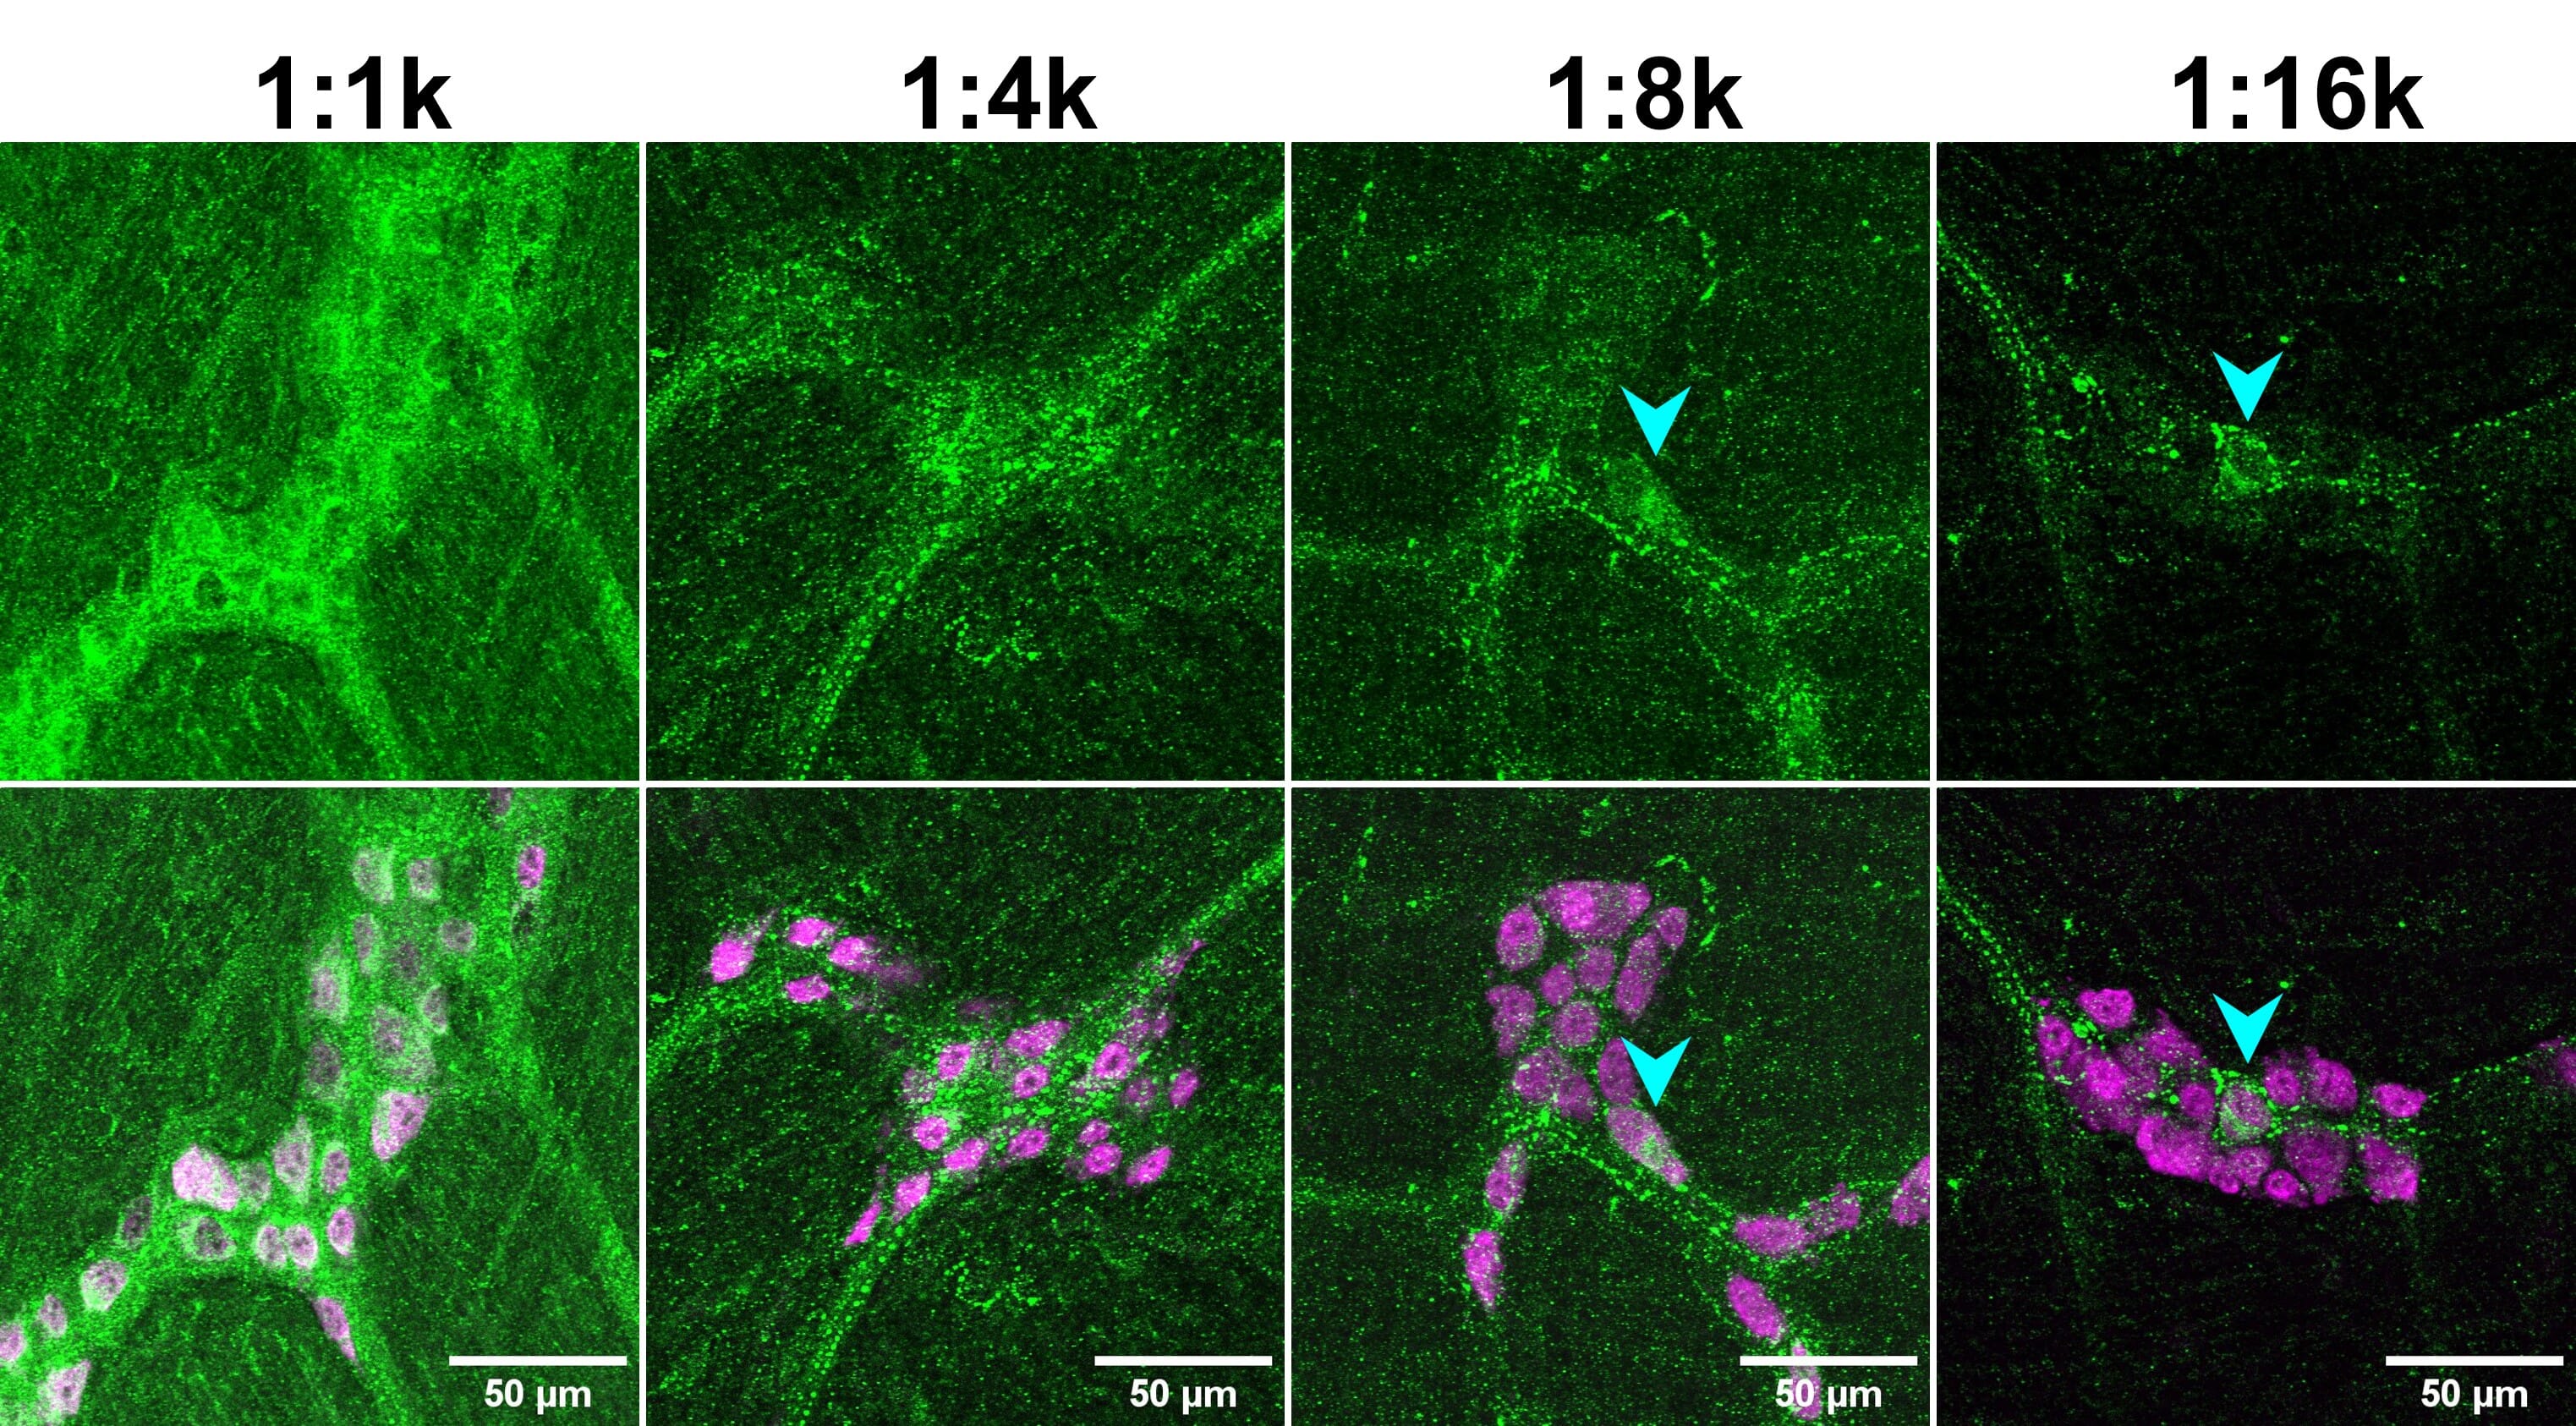
![IHC dilution series - Two rows of images depicting fluorescent IHC using a CCK-8 antibody at 1:1k, 1:4k, 1:8k and 1:16k]()
Figure 6: Primary antibody dilution affects signal-to-noise ratio (SNR). Mouse enteric nervous system tissue stained for CCK-8 (green) and HuC/D (magenta; bottom merge). Note how genuine cellular signal (cyan arrowheads) can only be observed at higher dilutions of the anti-CCK-8 antibody, when the background is decrease. Reproduced with permission; Copyright © 2024, Ryan Hamnett, PhD.
Application Compatibility
Antibodies are validated for specific applications. Those that work for western blot will not necessarily work for IHC, due to different reaction conditions and protein conformations. However, if available antibody options are limited, trialing different experimental conditions with a non-validated antibody can still yield valuable data.
Host and Multiplexing
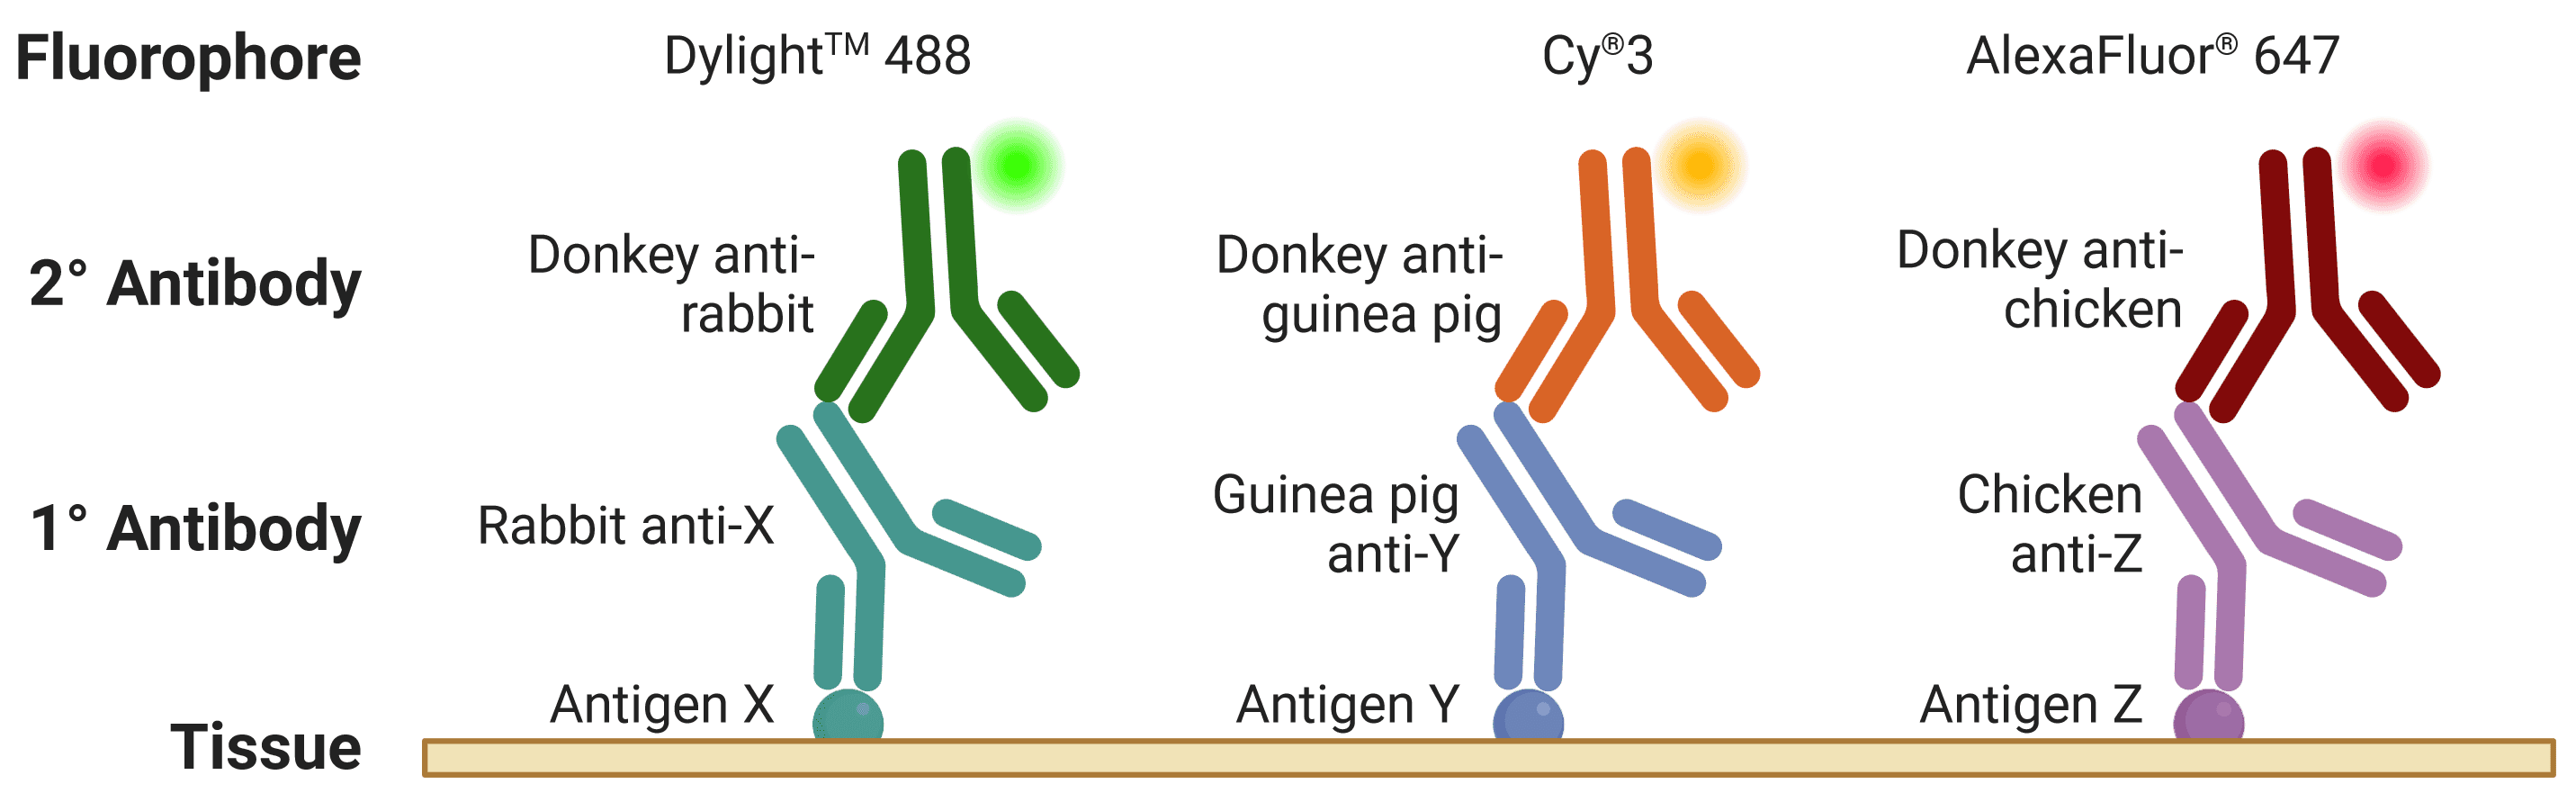
The host is the species of animal an antibody was raised in. This is particularly important to know when using indirect detection methods (see Detection methods), because secondary antibodies are directed against the host species of primary antibodies, as illustrated in Figure 7. Where possible, primary antibodies should not be from the same host species as the tissue under investigation, such as using mouse primary antibodies on mouse tissue, because secondary antibodies (e.g. goat anti-mouse) will recognize not only the primary antibody but other endogenous proteins too.
When performing multiplexed IHC, if two primary antibodies are used from the same host species, the secondary antibodies will recognize both primary antibodies, making them impossible to distinguish during visualization. This is further complicated by secondary antibodies recognizing other secondary antibodies, which is a risk when using primary antibodies raised in goat (e.g. donkey anti-goat secondary antibodies will bind both primary and secondary antibodies raised in goat).
![Diagram of multiplexed IHC, showing fluorophore-conjugated secondary antibodies recognizing primary antibodies from different host species]()
Figure 7: Multiplexed staining with IHC. Multiple antigens can be detected simultaneously by using primary antibodies raised in different species. Secondary antibodies will then recognize primary antibodies from a given species, and can be resolved under a fluorescence microscope through conjugation to spectrally distinct fluorophores.
Detection methods
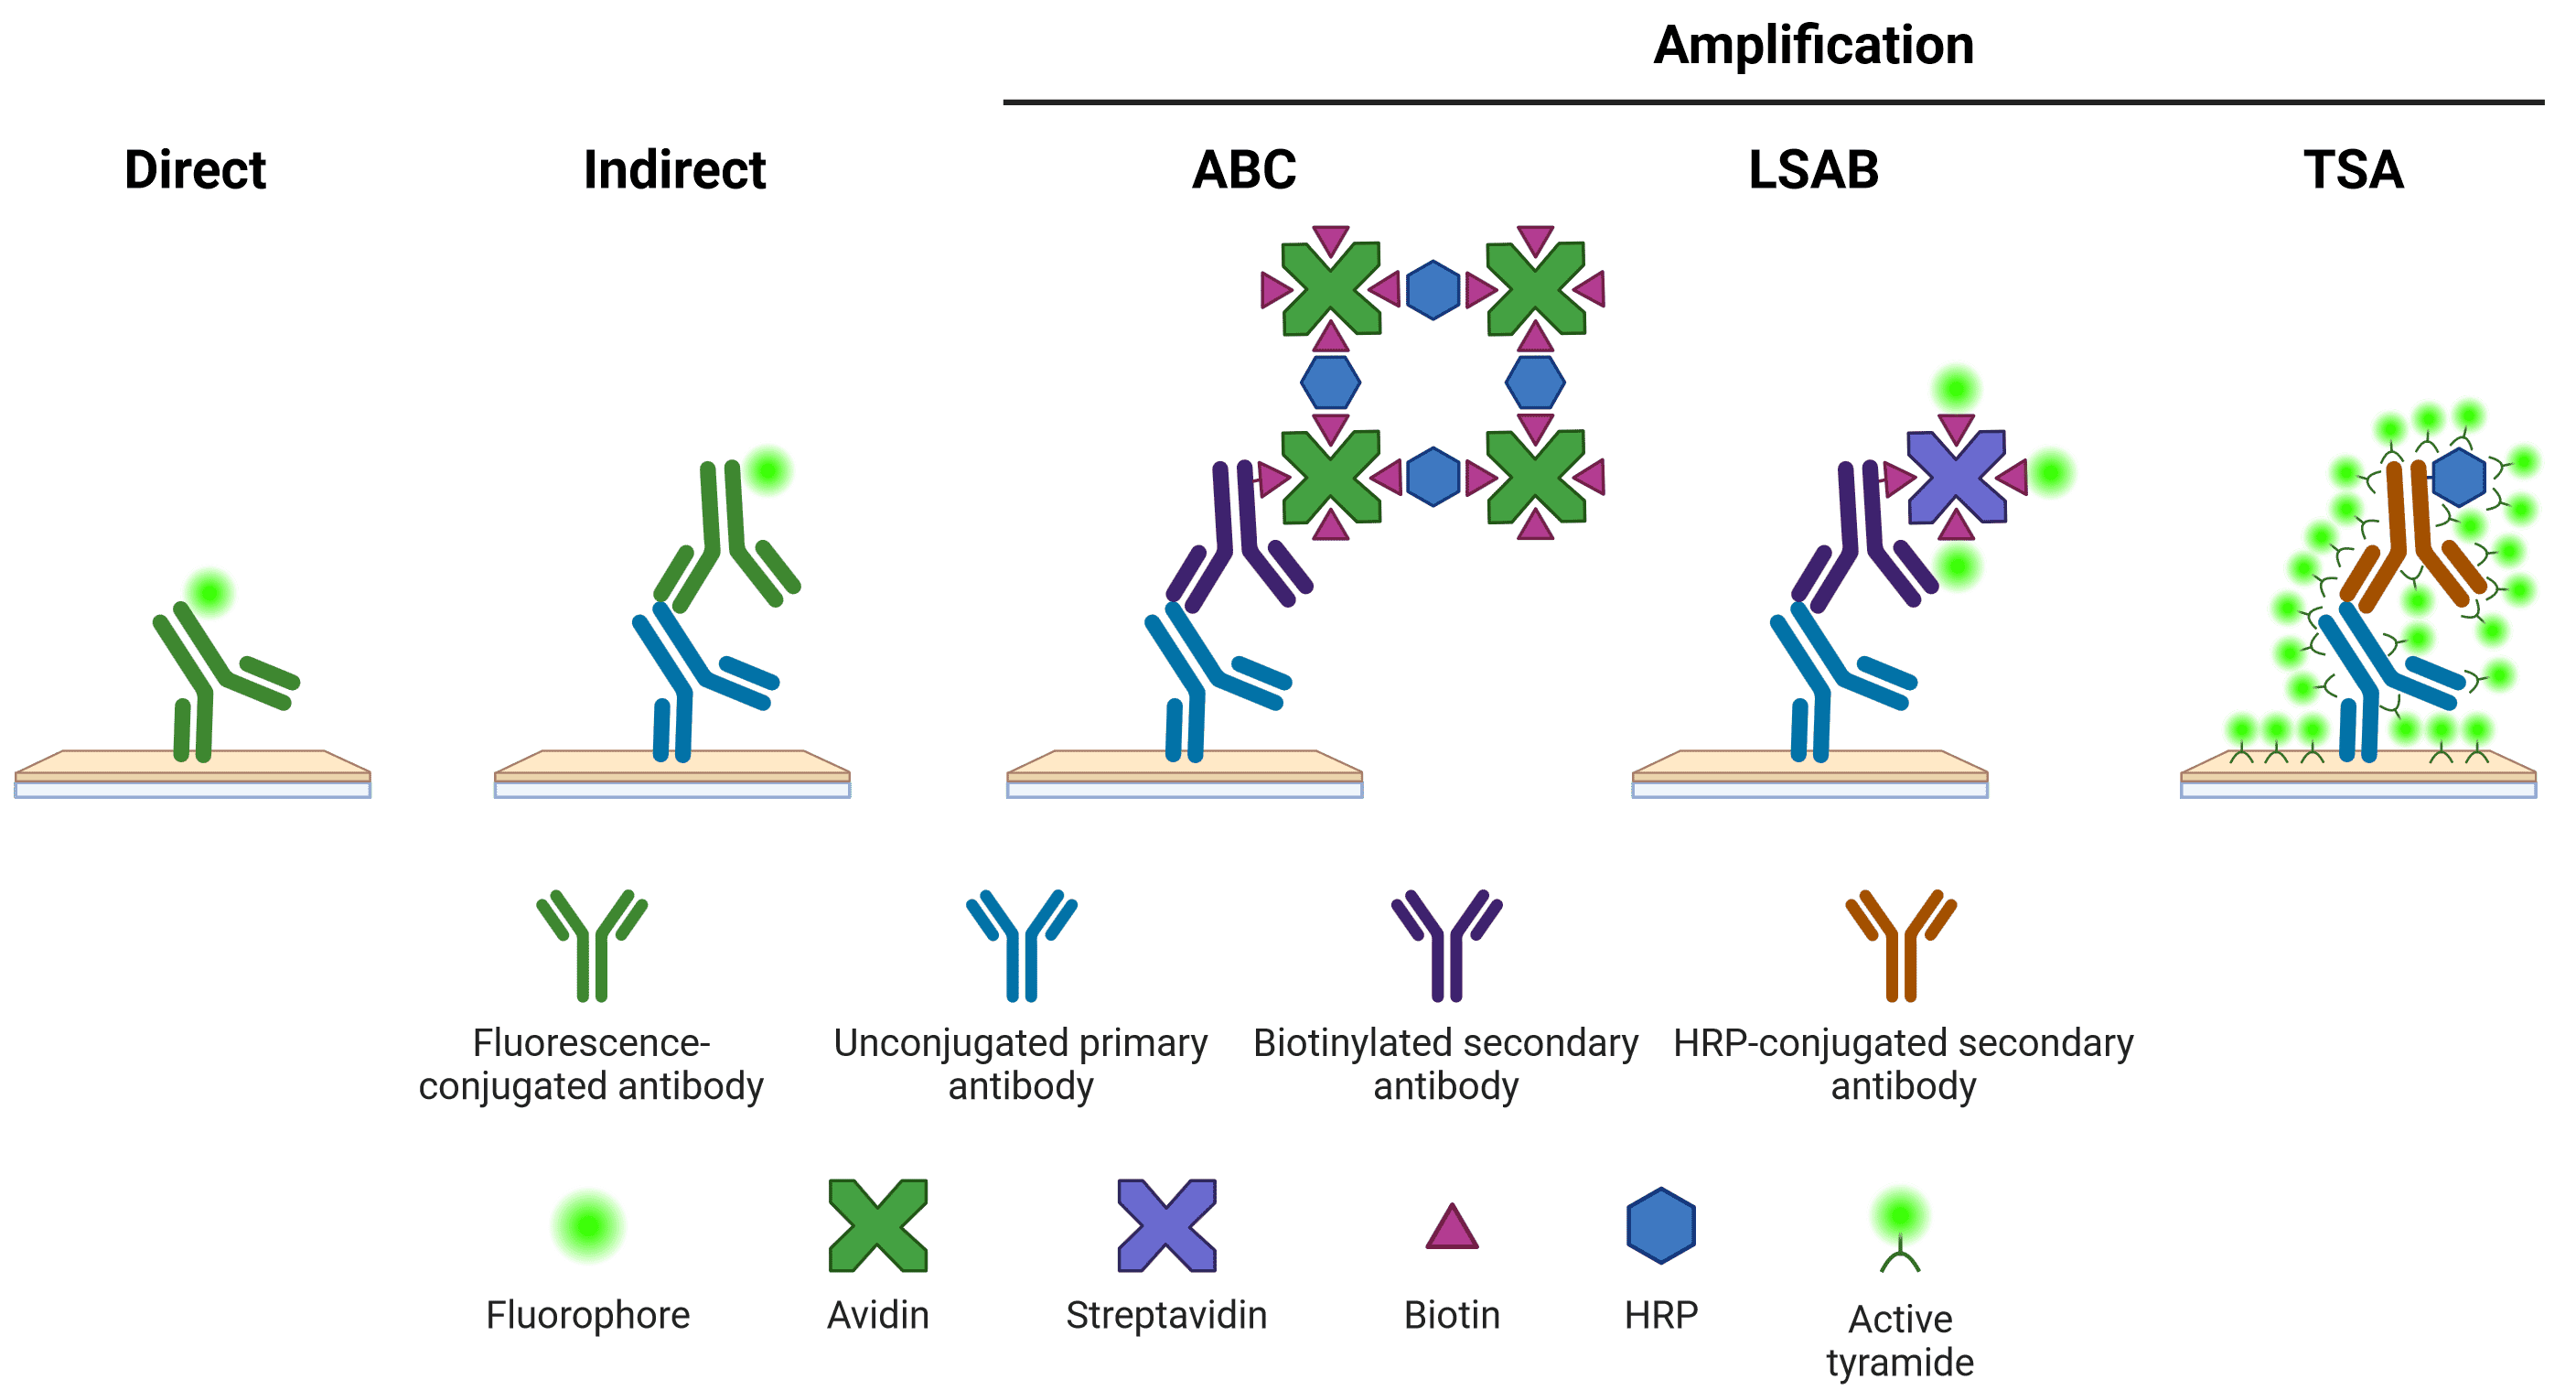
There are several options available for visualizing primary antibody staining in IHC (Figure 8). The staining may be detected using a direct or indirect method. In direct detection, the primary antibody itself is conjugated to a visualization system (a molecule that can generate a fluorescent or chromogenic signal). In indirect detection, a secondary antibody, which recognizes the primary antibody and is conjugated to a visualization system, is incubated with the tissue sample. Indirect detection systems offer superior signal intensity, as multiple secondary antibodies can bind to one primary antibody. Secondary antibodies also offer greater flexibility, able to recognize many different primary antibodies from the same host, which may not be available pre-conjugated from commercial sources. However, secondary antibodies can also result in a higher background signal and therefore require optimization.
Signal Amplification
An additional indirect amplification step can be performed, such as by using the avidin-biotin complex (ABC) or labeled streptavidin-biotin (LSAB) systems, or tyramide signal amplification (TSA). ABC and LSAB use a biotin conjugated secondary antibody to bind multiple avidin or labeled streptavidin molecules, while the TSA system requires an HRP-conjugated secondary antibody to catalyze the conversion of inactive, labeled tyramide to a reactive radical, which then binds nearby tyrosine residues. New amplification systems, such as using multiple rounds of complementary secondary antibodies8, continue to be developed.
Figure 8: Schematic representation of different methods of target detection. Methods of amplification include the avidin-biotin complex (ABC), labeled streptavidin-biotin (LSAB) and tyramide signal amplification (TSA) systems. Note that direct, indirect and LSAB methods can be either chromogenic or fluorescent. ABC is typically chromogenic, and TSA is always fluorescent.
Chromogenic vs Fluorescence
The primary or secondary antibody may be conjugated to a fluorophore or an enzyme that can react with a substrate to produce a chromogenic product. The features, advantages and limitations of each approach are outlined below.
| Feature | Chromogenic | Fluorescent |
| Resolution | Precipitate deposited over a larger area compared with fluorescent source | Very high resolution, even allowing single-molecule detection |
| Stability | Many precipitates are stable over many years | Fluorophores are less stable over time and fade in light |
| Time | Usually a longer procedure than fluorescent methods, due to longer preparation, blocking and incubation steps | Faster procedure |
| Multiplexing | Typically limited to two colors because of difficulties in distinguishing them under a light microscope | Ideal for multiplexing, with at least 4 colors being easily distinguishable on many microscopy set ups |
| Amplification | ABC, LSAB | TSA |
| Microscopy | Brightfield microscope | Fluorescence microscope, which is often more expensive |
Table 2:Features of chromogenic and fluorescent detection methods
Figure 9: Indirect chromogenic and fluorescent IHC
Chromogenic detection
The most commonly used enzymes for chromogenic detection are HRP and alkaline phosphatase (AP) (Table 3), which convert substrates into colored precipitates at the site of antigen binding. While enzyme-based methods can increase sensitivity, both HRP- and AP-based detection can be confounded by endogenous enzyme activity, which must be quenched first by H2O2 or levamisole, respectively. Chromogenic visualization systems may be more sensitive than the fluorochrome-based method, can also be multiplexed, and can be imaged using a standard light microscope setup.
| Enzyme | Substrate | Color | Mounting media | Advantages | Disadvantages |
| Horseradish peroxidase (HRP) | DAB | Brown | Organic/aqueous | Intense colorInsoluble | |
| DAB + nickel enhancer | Black | Organic/aqueous | Intense colorInsolubleMore sensitive than DAB alone | |
| True Blue | Blue | Organic | Increased sensitivityStrong contrast to other colorsStable | Fades in aqueous mounting media |
| 4-CN | Blue-purple | Aqueous | Distinct color for contrastLow costNewer versions exist to ameliorate disadvantages | Less sensitiveNon-permanentSoluble in organic mounting media |
| Vina green | Green | Organic/aqueous | PermanentColor contrast | |
| AEC | Red | Aqueous | Intense colorContrasts well with blue stains | Soluble in organic mounting media |
| Alkaline phosphatase | BCIP/NBT | Blue-black | Organic | Intense color | |
| Blue Substrate | Blue | Aqueous | Increased sensitivityPermanentColor contrast for double stainingFluorescent | Soluble in organic mounting media |
| Fast Red | Red | Aqueous | Color contrastFluorescent | Soluble in organic mounting media |
| Permanent Red | Red | Organic/aqueous | Color contrast | |
Table 3:Comparison of commonly used chromogens in IHC
Fluorescent detection
For the indirect method, fluorescently conjugated antibodies targeting multiple different host species are ideal to perform multicolor IHC. Selecting suitable fluorophores depends on a number of factors. For example, brightness of a fluorophore can vary widely, so it is recommended that the brightest fluorophore is used to detect the least abundant antigen. In general, fluorophores at the blue end of the spectrum tend to be the dimmest (which also makes counterstaining with the blue DAPI ideal – see Counterstains and mounting below).
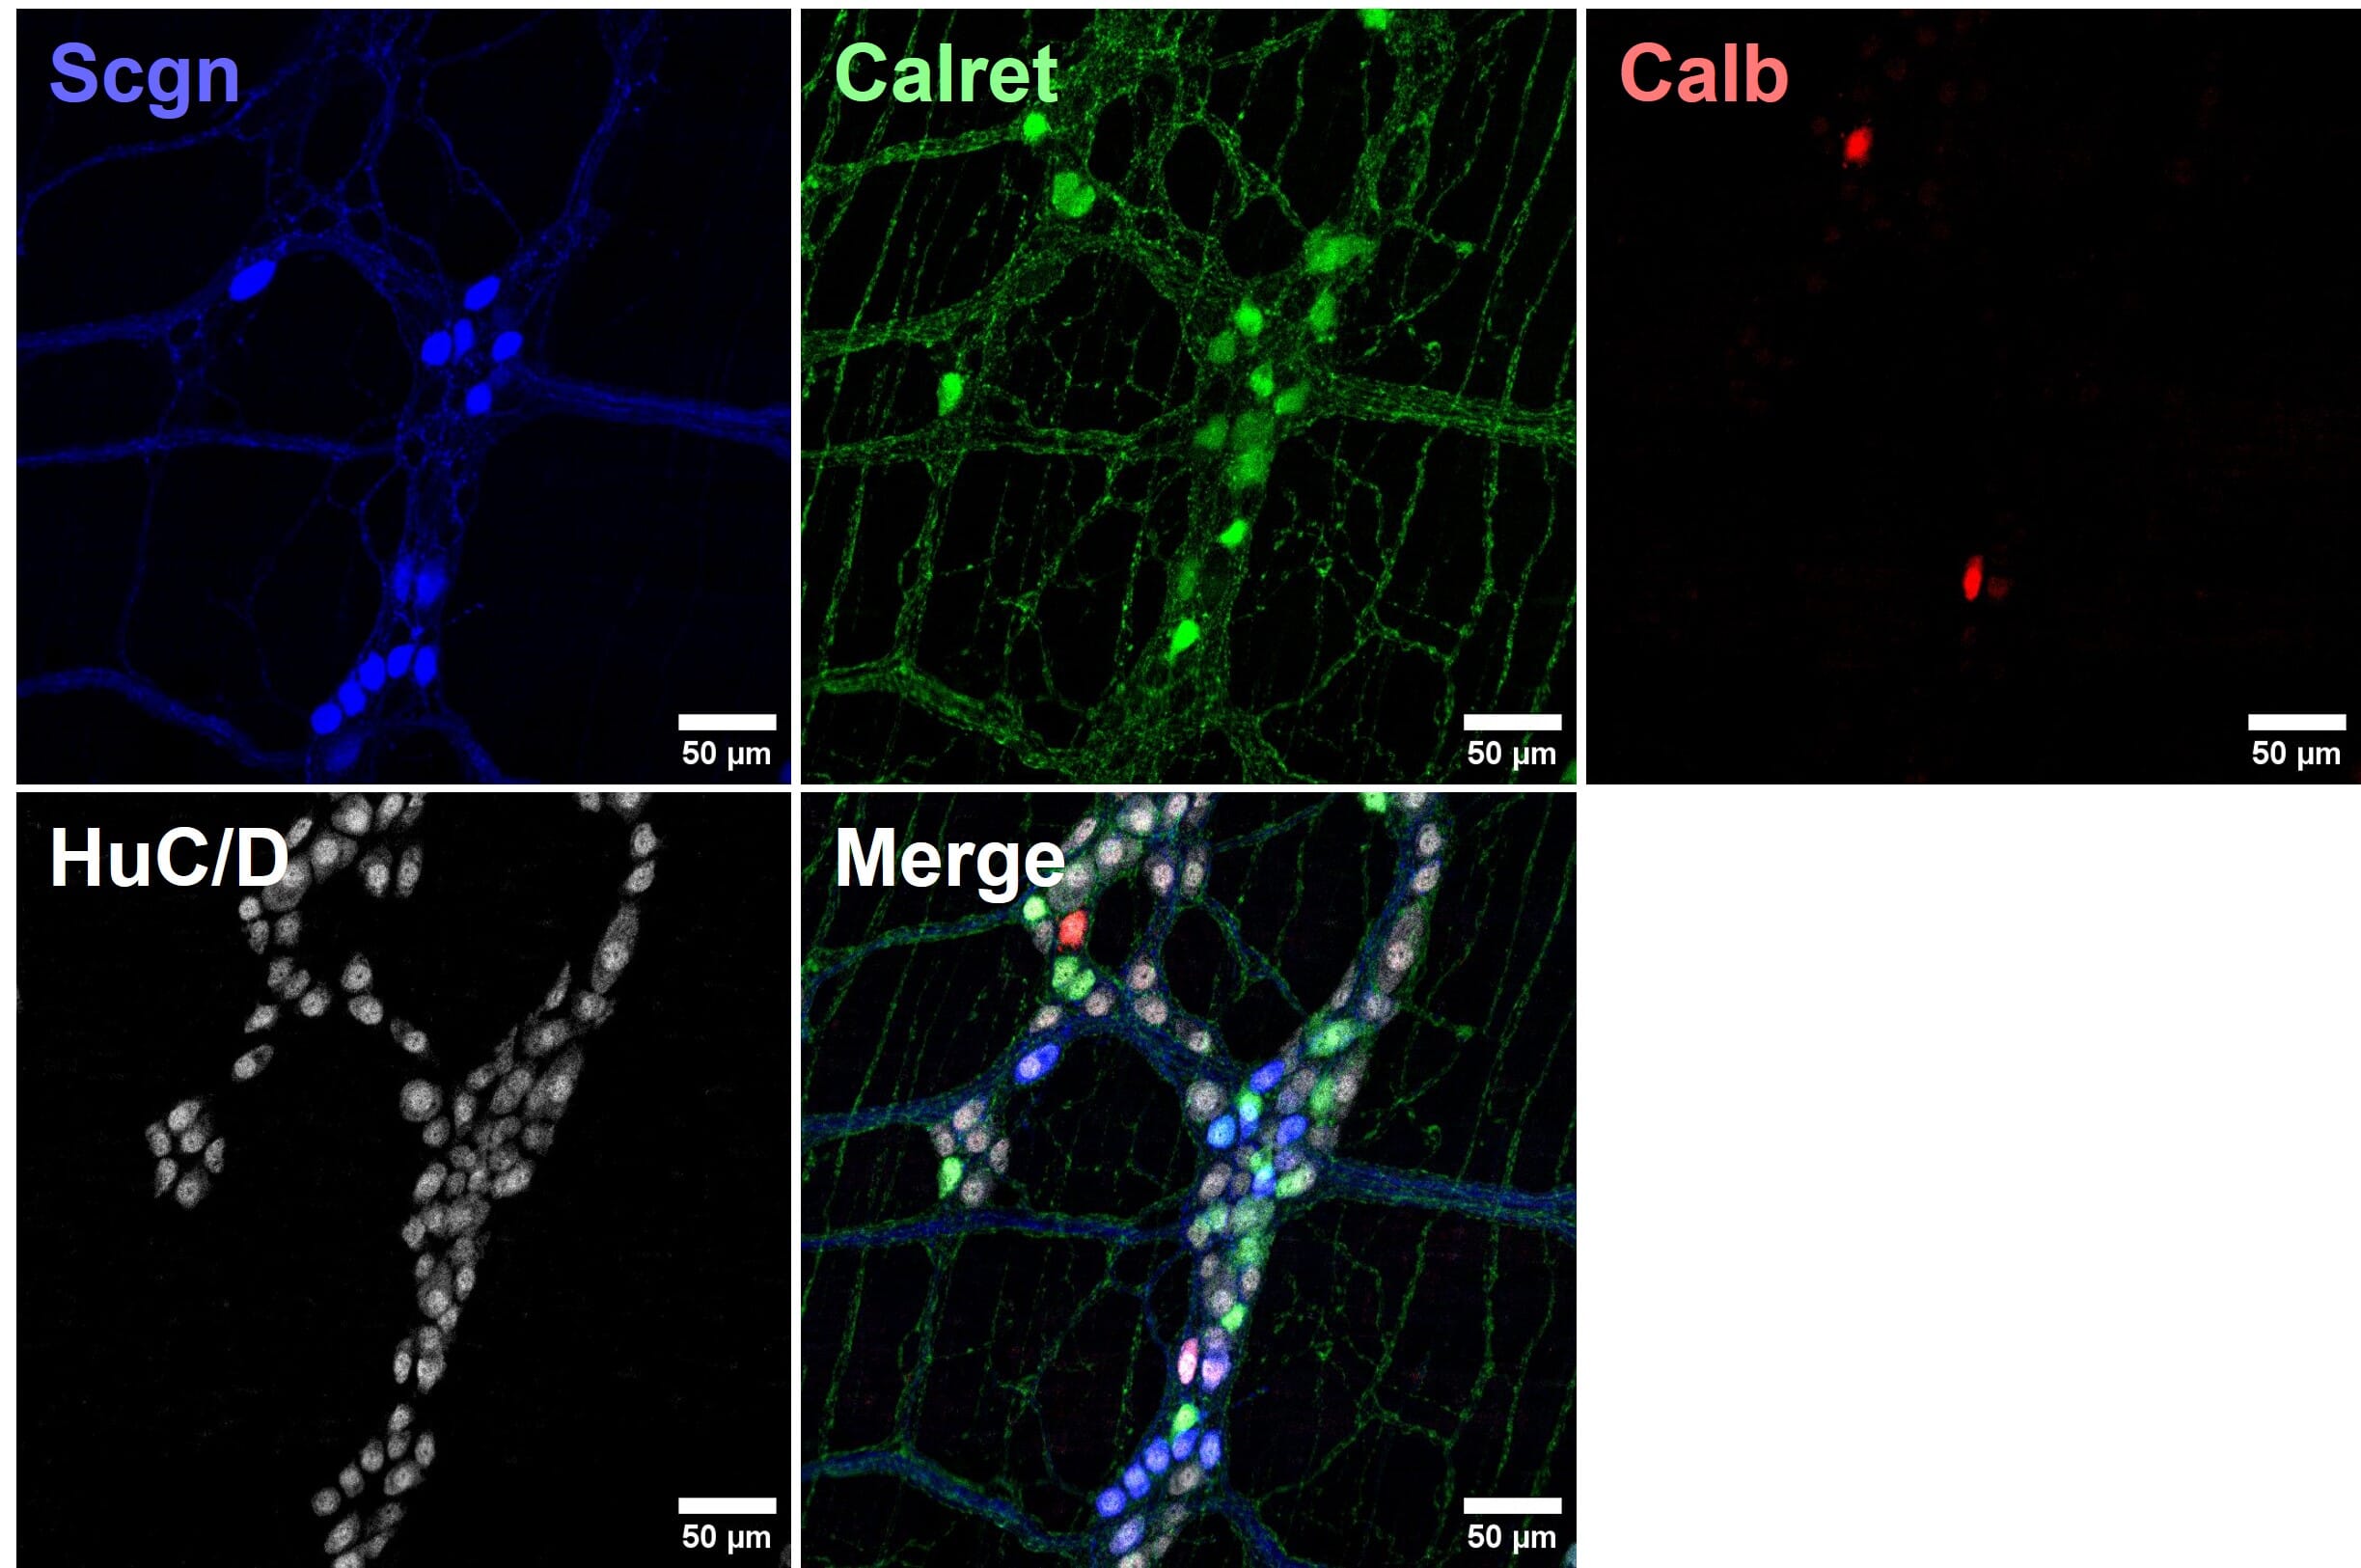
One of the most important factors is spectral overlap, which refers to the fluorescence excitation and emission ranges of each fluorophore being far enough separated to not interfere with each other. Therefore, colors that are close to each other in wavelength, such as green and yellow, or orange and red, are harder to separate reliably. Online spectrum viewers allow researchers to see the extent of overlap prior to choosing fluorophores. The selected fluorophores should also be compatible with available microscope(s), such that they can be optimally excited and detected. Four-color staining can be reliably performed in most labs with a suitable fluorescent microscope setup (such as a confocal microscope)(Figure 10), while higher level multiplexing is also feasible.9
![Two rows of fluorescent images depicting 4 color IHC]()
Figure 10: Four color multiplexed imaging with spectrally distinct fluorophores and a confocal microscope. Mouse enteric nervous system samples immunostained for calcium binding proteins seretagogin (Scgn; Alexa Fluor 405), calretinin (Calret; Alexa Fluor 488) and calbindin (Calb; Cy3), and pan-neuronal marker HuC/D (Alexa Fluor 647). Reproduced with permission; Copyright © 2024, Ryan Hamnett, PhD.
Counterstains and mounting
For fluorescent IHC, samples can be counterstained with various organelle-specific, fluorescently conjugated dyes. The nucleus is the most common target of such stains (Table 4), which can be achieved by short incubations with DAPI or Hoechst 33342 immediately before mounting, which emit fluorescence in the blue range. Counterstaining is also possible when using a chromogenic visualization system. For example, the brown staining produced from DAB is compatible with hematoxylin staining to label nuclei. Specific organelles can also be targeted with either fluorescent or chromogenic dyes to match the needs of the experiment (Table 5; Figure 11).
| Name | Type | Target | Color |
| Hematoxylin | Chromogenic | Chromatin | Blue-violet |
| Methyl green | Chromogenic | Nuclein acids | Green |
| Nuclear Fast Red | Chromogenic | Nuclein acids | Red |
| DAPI | Fluorescent | Nuclein acids | Blue |
| Hoechst 33342 | Fluorescent | Nuclein acids | Blue |
| Hoechst S769121 | Fluorescent | Nuclein acids | Yellow |
| DRAQ5 | Fluorescent | Nuclein acids | Far red |
| DRAQ7 | Fluorescent | Nuclein acids | Far red |
Table 4:Comparison of commonly used nuclear stains in IHC
| Name | Type | Target | Color |
| Cresyl violet | Chromogenic | Nucleic acids in neuronal nuclei and rough endoplasmic reticulum | Violet |
| Janus Green B | Chromogenic | Mitochondria | Green |
| Eosin | Chromogenic | Cytoplasm and extracellular matrix | Red-pink |
| Congo red | Chromogenic | Amyloids | Red |
| Sirius red | Chromogenic | Collagen | Red |
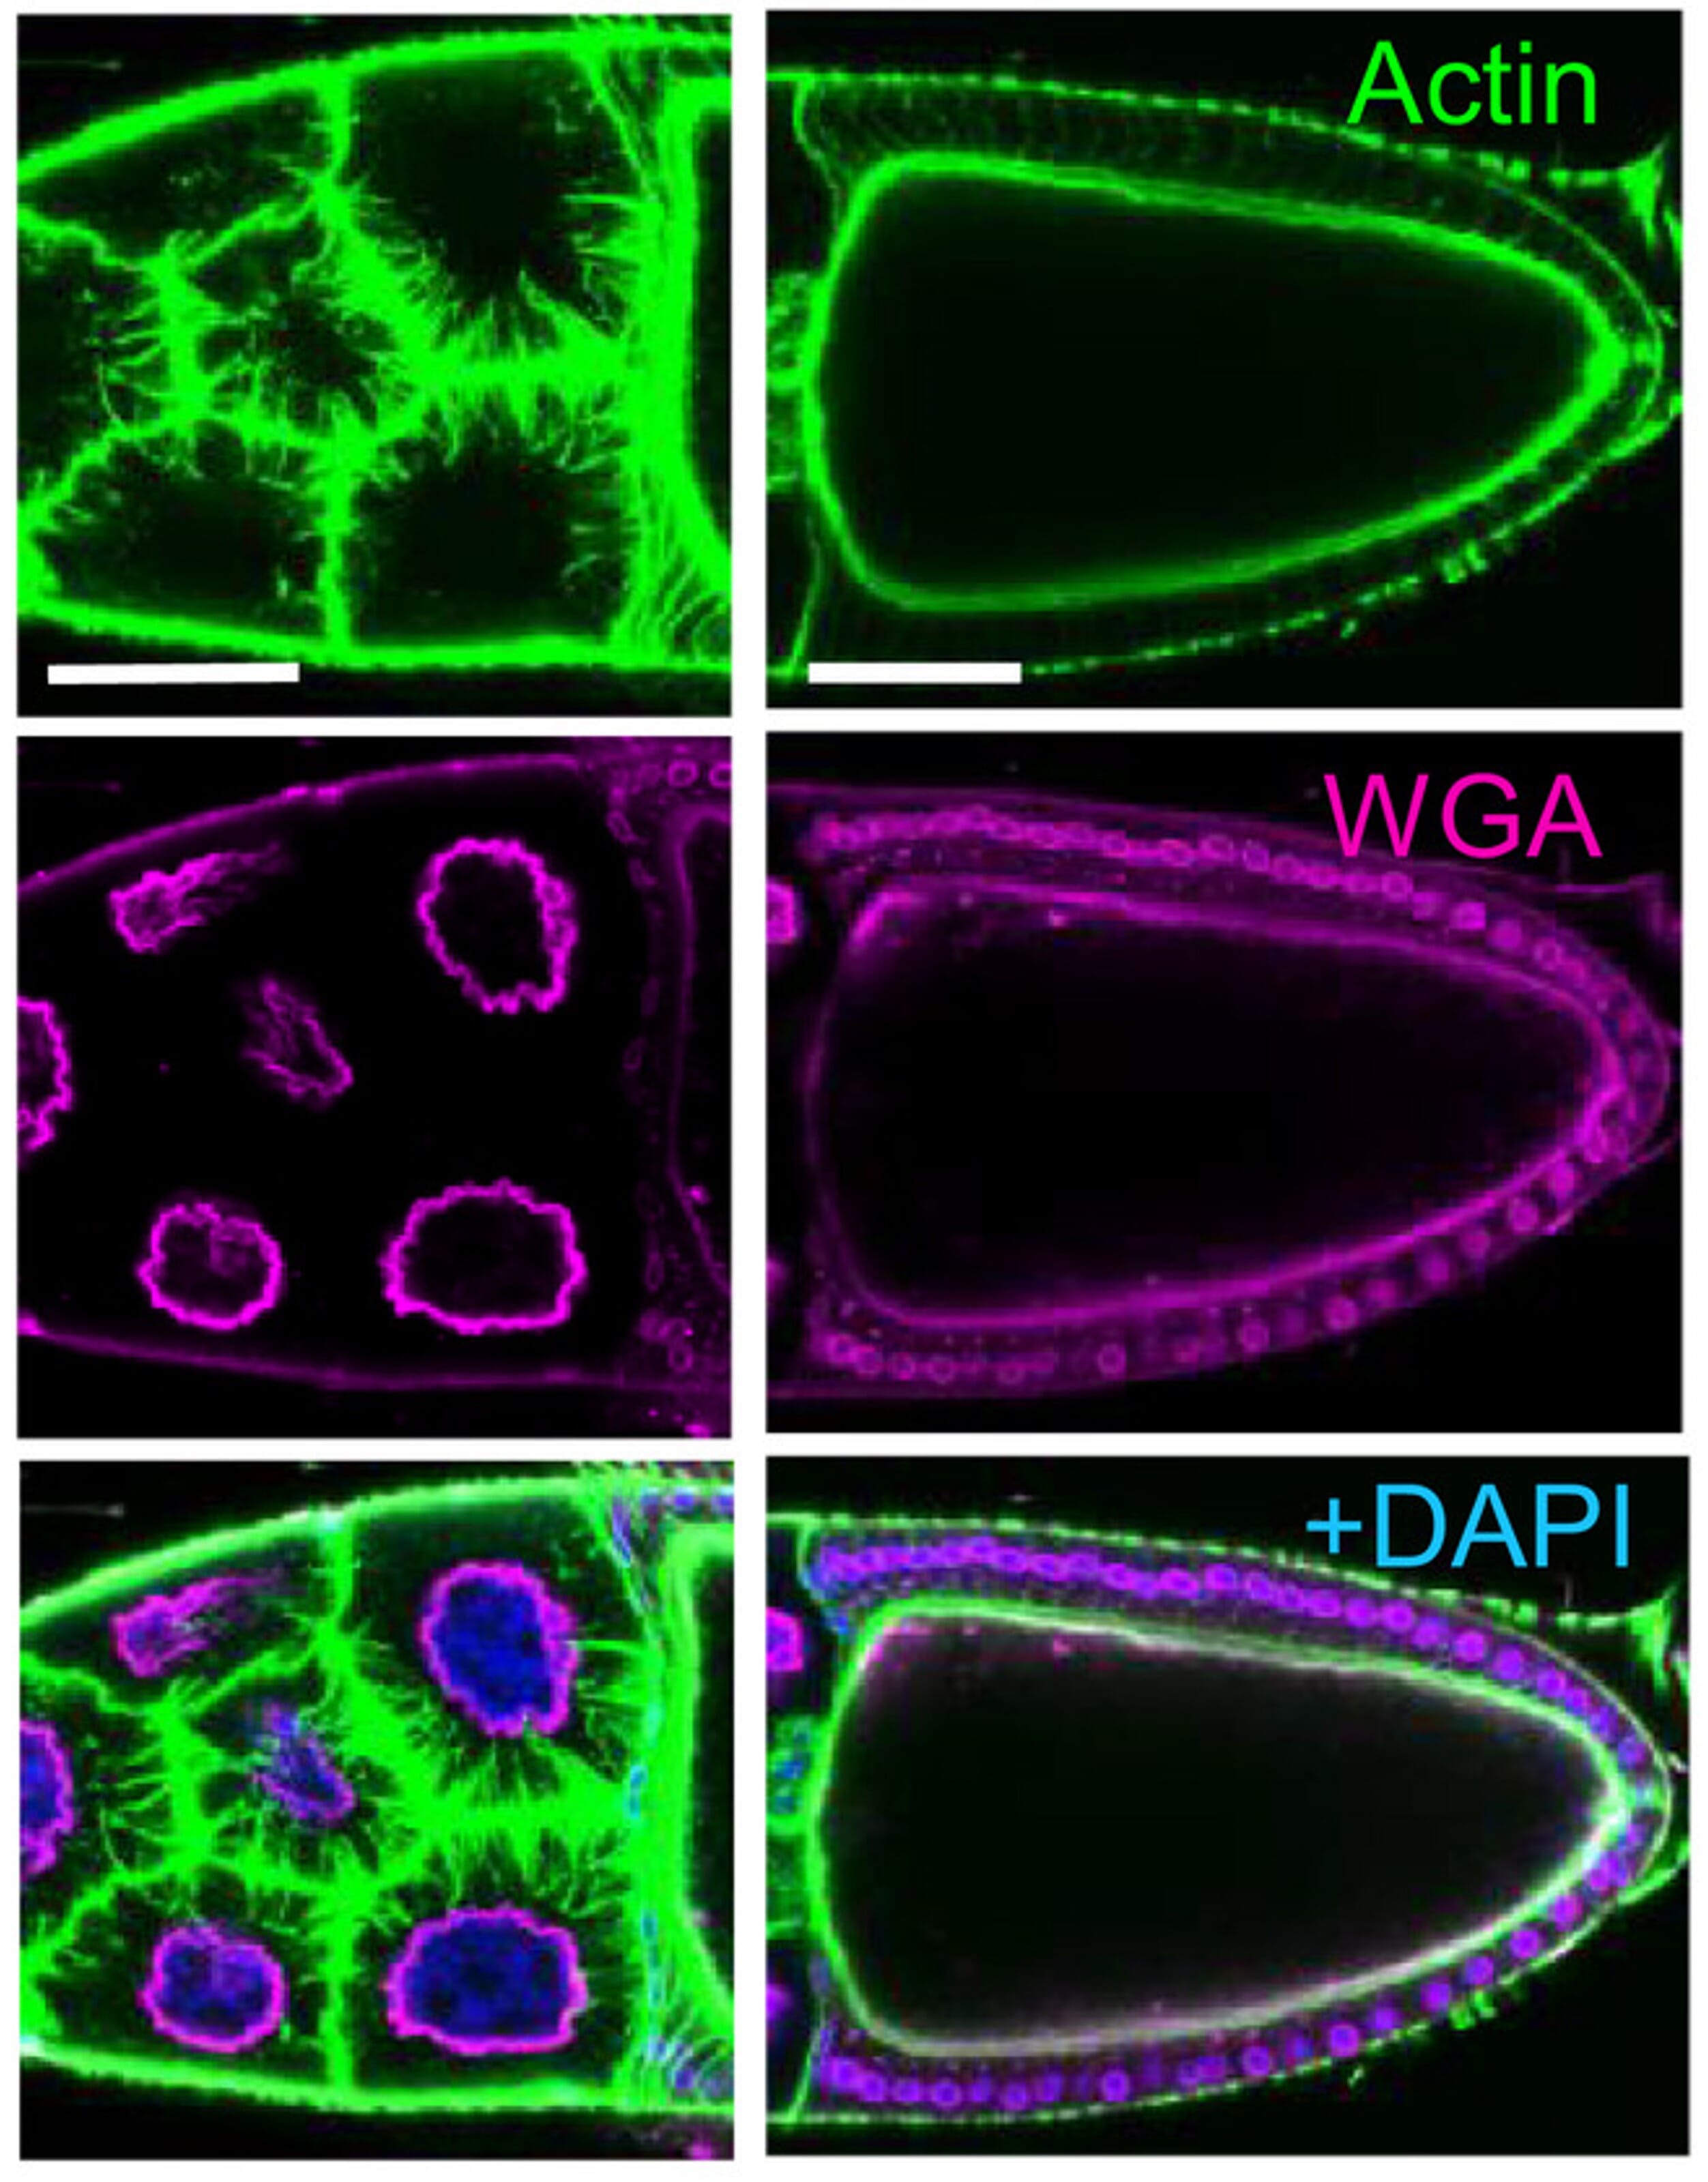
| Phalloidin | Fluorescent | Actin filaments | Conjugated to various fluorophores |
| Wheat germ agglutinin (WGA) | Fluorescent | Plasma membrane | Conjugated to various fluorophores |
Table 5:Chromogenic and fluorescent stains for specific organelles or structures
Figure 11: Example of actin and plasma membrane staining using fluorescently conjugated phalloidin and wheat germ agglutinin, respectively. Counterstaining of nuclei was performed using DAPI. Image depicts stage 10B egg chamber of Drosophila females. Left: nurse cells; Right: oocyte. Scale bars: 50 μm.
Edited and reproduced under Creative Commons 4.0 CC-BY from Bajusz, C. et al. The nuclear activity of the actin-binding Moesin protein is necessary for gene expression in Drosophila. FEBS J. 288, 4812–4832 (2021).
See the other sections of our IHC guide:
References
Diagrams created with BioRender.com.
- Wu, Y., Li, Q. & Chen, X.-Z. Detecting protein–protein interactions by far western blotting. Nat. Protoc. 2, 3278–3284 (2007).
- Arkin, M. R., Glicksman, M. A., Fu, H., Havel, J. J. & Du, Y. Inhibition of Protein-Protein Interactions: Non-Cellular Assay Formats. in Assay Guidance Manual (2012).
- Childs, G. History of Immunohistochemistry. in Pathobiology of Human Disease, 3775–3796 (2014).
- Marrack, J. Nature of Antibodies. Nature 133, 292–293 (1934).
- De Matos, L. L., Trufelli, D. C., De Matos, M. G. L. & Da Silva Pinhal, M. A. Immunohistochemistry as an Important Tool in Biomarkers Detection and Clinical Practice. Biomark. Insights 5, 9-20 (2010).
- Kiernan, J. A. Formaldehyde, Formalin, Paraformaldehyde And Glutaraldehyde: What They Are And What They Do. Microsc. Today 8, 8–13 (2000).
- Iida, M., Ihara, S. & Matsuzaki, T. Hair cycle-dependent changes of alkaline phosphatase activity in the mesenchyme and epithelium in mouse vibrissal follicles. Dev. Growth Differ. 49, 185–195 (2007).
- Yeon, H., Cho, Y., Seo, J., Sim, Y. & Chang, J.-B. Simultaneous amplification of multiple immunofluorescence signals via cyclic staining of target molecules using mutually cross-adsorbed antibodies. Sci. Rep. 12, 8780 (2022).
- Gorris, M. A. J. et al. Eight-Color Multiplex Immunohistochemistry for Simultaneous Detection of Multiple Immune Checkpoint Molecules within the Tumor Microenvironment. J. Immunol. 200, 347–354 (2018).